


chezlin ·
chezlin ·

I live in a shotgun style home, where we have no hallways and it's basically just series of rooms, back to back. Some shotgun homes have doors to separate the rooms, but some, like mine, only have doorways. No doors. I've grown accustomed to the openness of being able to see basically all of the rooms if you look through a doorway, but I did also somewhat miss having a bit of separation between each room. My solution to this was to whip up a few sheer noren curtains. So of course, I'm going to be sharing with you this easy sewing project!
 Supplies
 First, you'll need to measure the width of your door and then how long you want the curtains to fall.
 Divide the width by half. Add 1/2 of an inch to each side. Add 4 inches on top and 2 inches on bottom. Cut out these two measurements from your fabric.
 Put the fabric together, right sides together, mark down 8 inches, 1/2 of an inch in. (Note: My measurements are twice as big because after cutting the fabric, I realized I didn't have to finish the outer edges of the curtains because they were the selvage edges. So instead of trimming 1 inch off every piece of fabric (I made 3 all together) I just made the seams twice as large on the inside.
Sew along the line and then fold open.
 Fold 1/4 of an inch and iron that down. Then fold another 1/4 of an inch, iron again and pin. I skipped all of the ironing parts on the first one I made, which was a huge mistake. For the other two I ironed after each fold and it made the job so much easier. So do as I say, not as I do.
 Sew the seam down along the edge. This will encase the raw edge of the fabric in the seam, making them look nice and neat! Repeat this process on the outer edges of the curtain. Fold 1/4 inch, iron, fold 1/4 inch, iron, pin, sew.
 For the top, fold down 1/4 inch, iron, fold down 2 inches, iron, pin, sew.
 For the bottom, fold down 1/4 inch, iron, fold down 1 inch, iron, pin, sew. Repeat on the other flap.
And you're done!
 Now from here you can either leave them plain or you can decorate! I was already thinking about decorating them, but after I put up this plain one to see how it looked, I decided I was definitely going to decorate them. They just didn't do it for me in their plain state. It probably didn't help that this particular curtain looks horrible because the tension of my sewing machine was off so it puckered the seams really bad.
But anyway, to decoration!
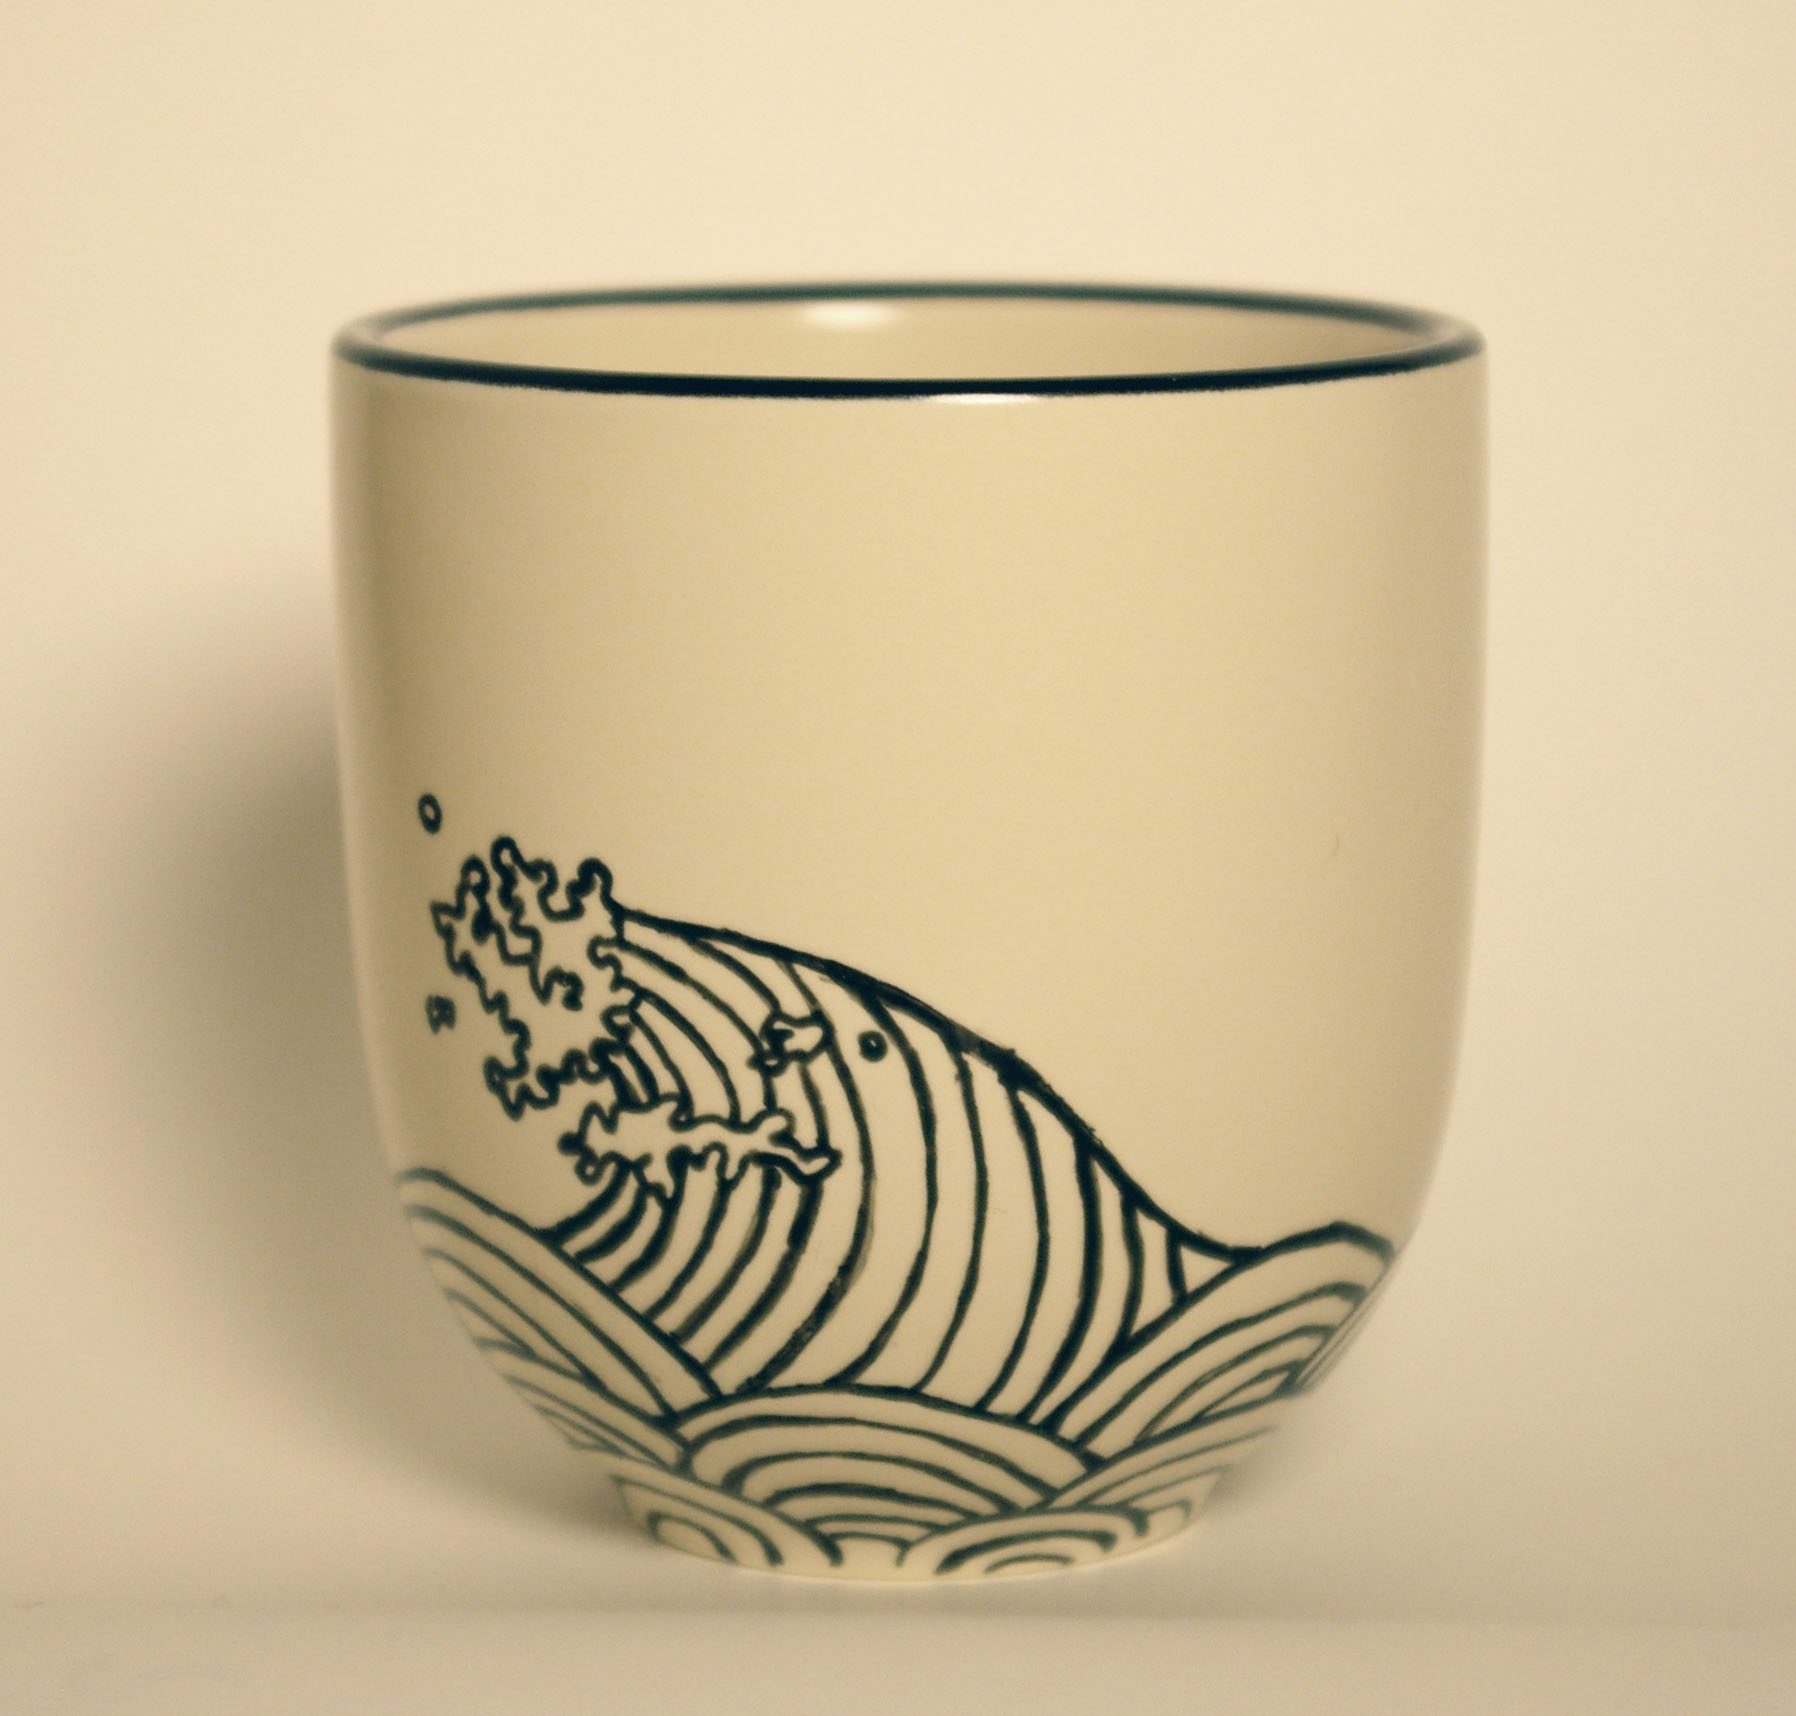
 For this one I drew an ensō circle. It's supposed to "express a moment when the mind is free to let the body create." I thought it would be perfect to put up in one of the doorways to our office/studio/wood shop.
 For this one I just painted some pretty standard bamboo.

And for this one I painted the whole curtain, sans a circle in the middle, with a dark greyish blue. After that dried I painted the circle with liquid gold leaf.
And here they are all hung up!


I hope you all enjoyed this project! I'm glad I didn't give up after I hung that first plain one. I almost did. But I think they look so much better after painting on them.
What do you all think?
chezlin ·
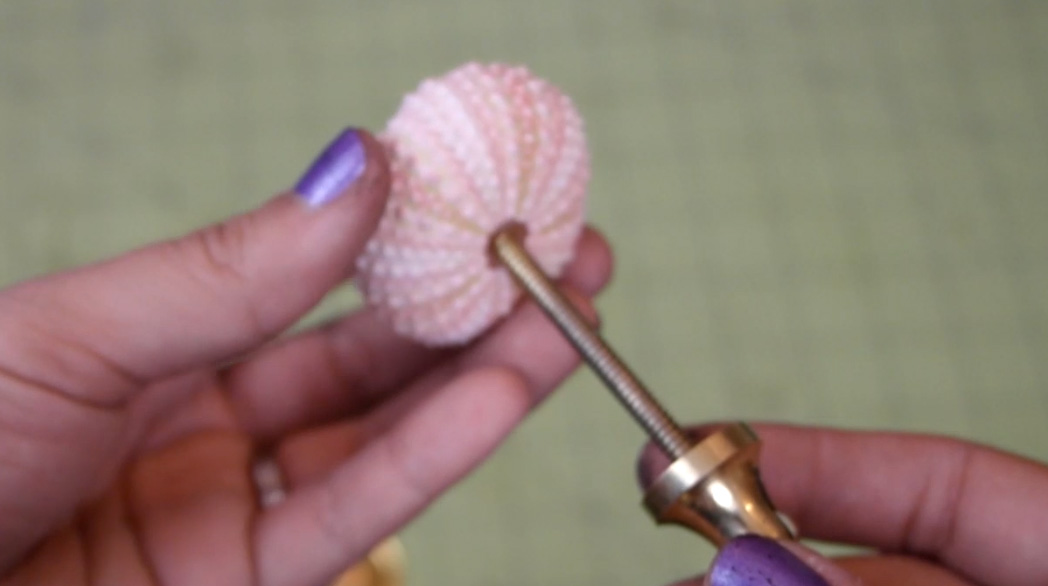
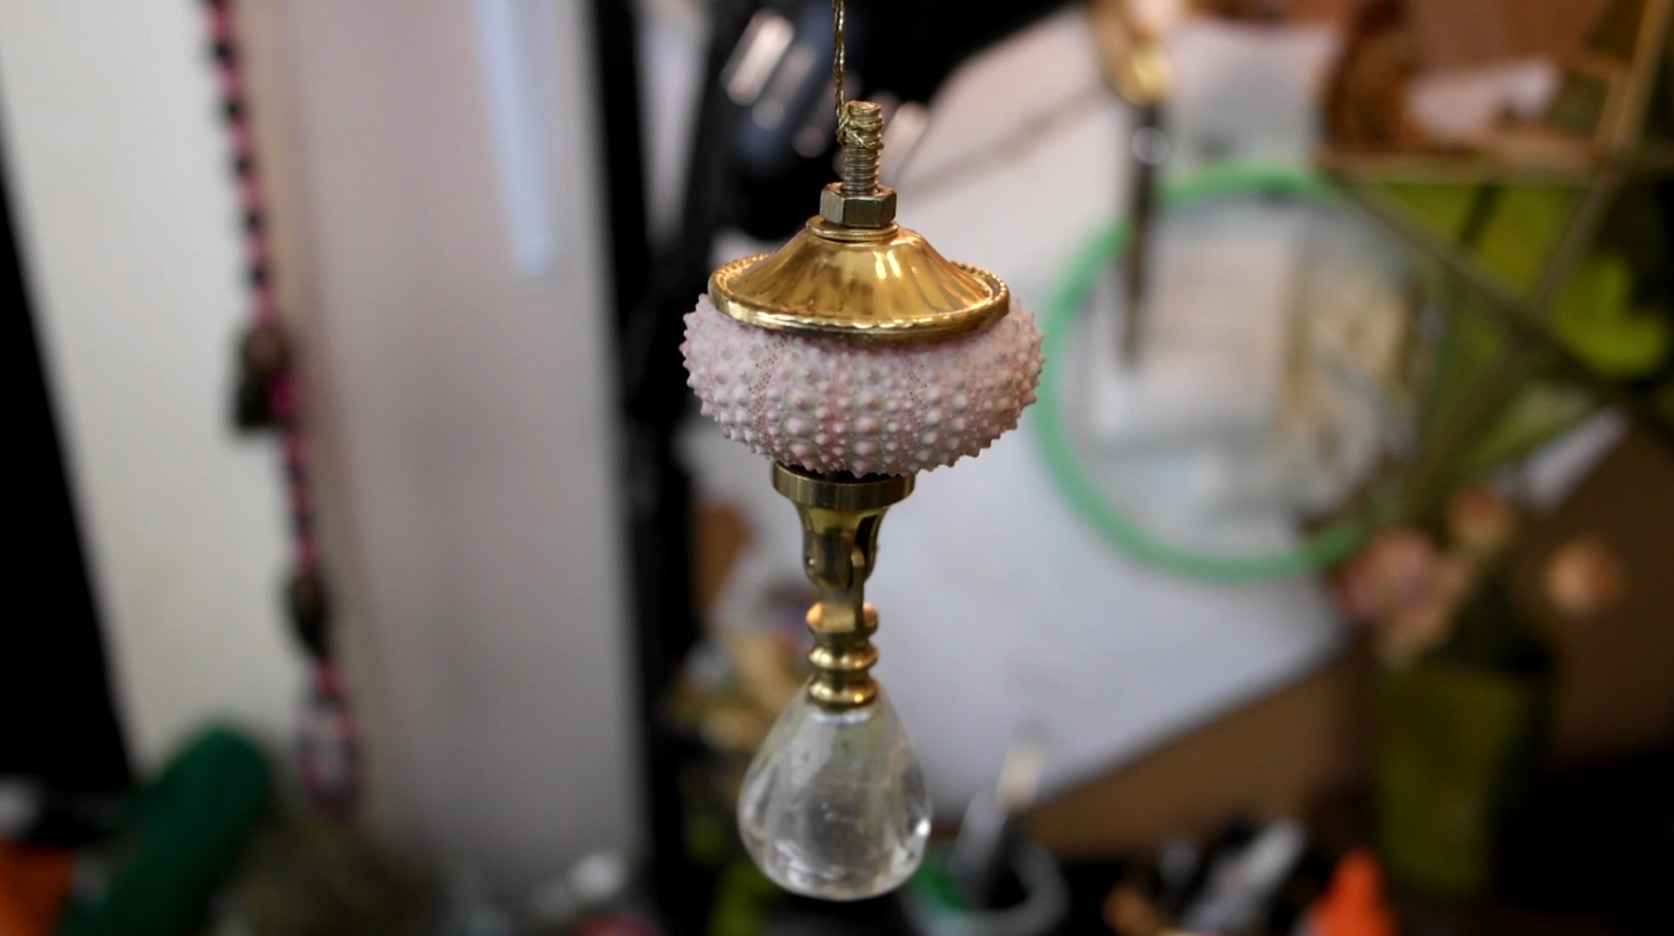
Yesterday I posted a video of me making an ornament with a sea urchin using a lathe to turn the parts for it. I realize not everyone has access to a lathe, so I decided to put together some sea urchin ornaments using materials that a lot of crafters would have but also would be easy to find at your local craft store. A little video summary will follow!
I will be doing a giveaway for the wood turned ornament from yesterday, so if you're interested in that, click here for more information.
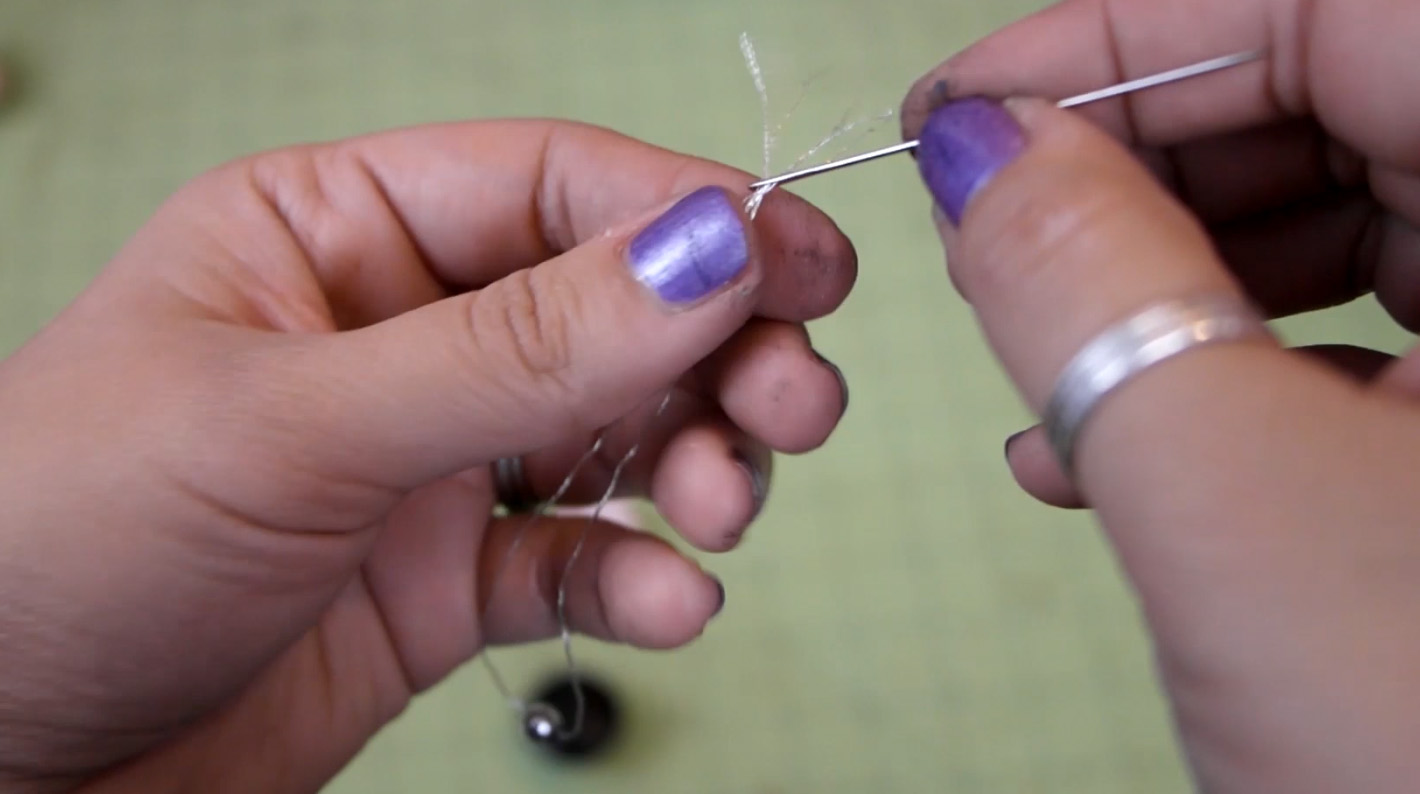
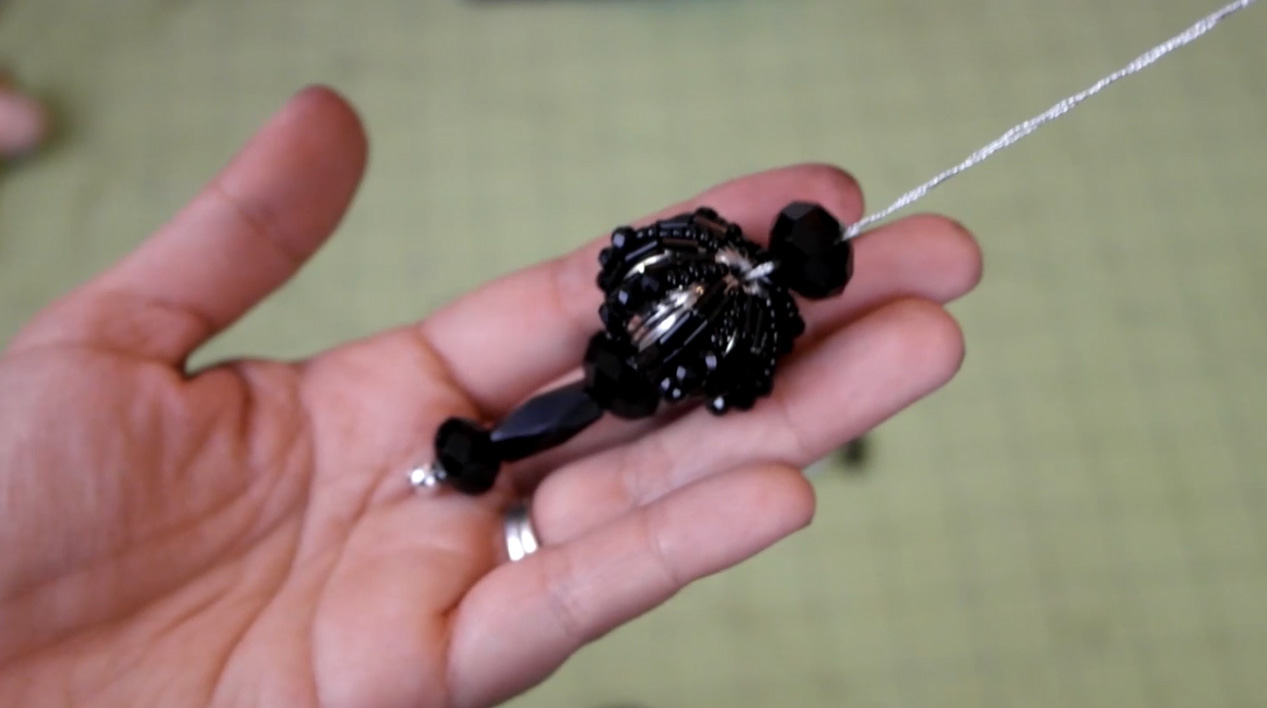
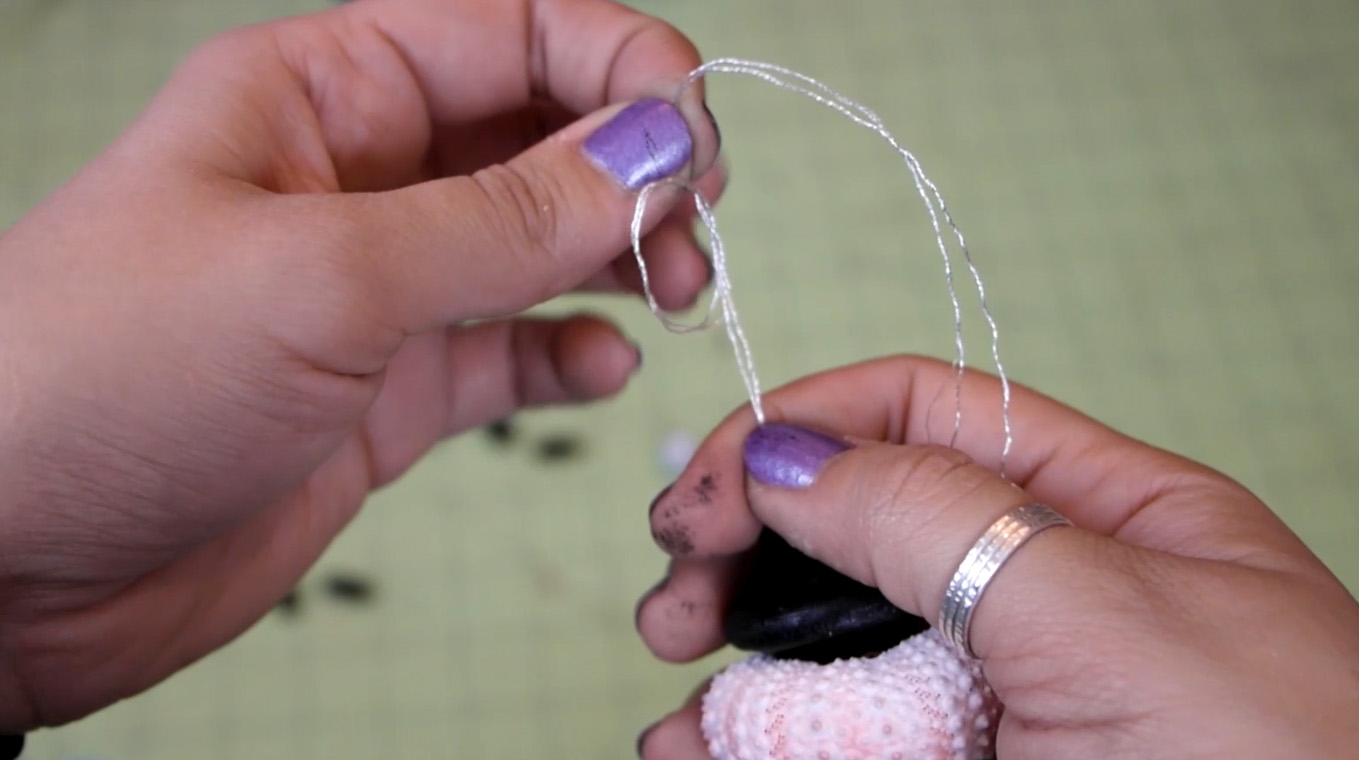
I made two different kinds of ornaments. One using a drawer pull I bought at my local craft store, and one using beads.
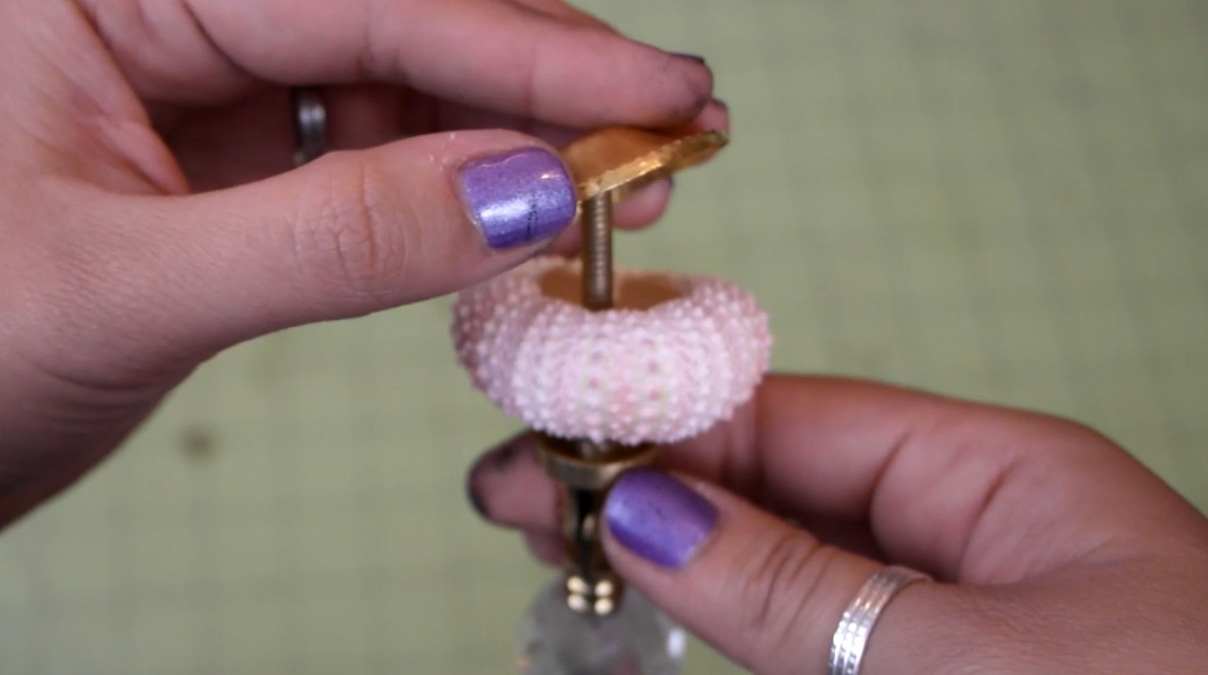
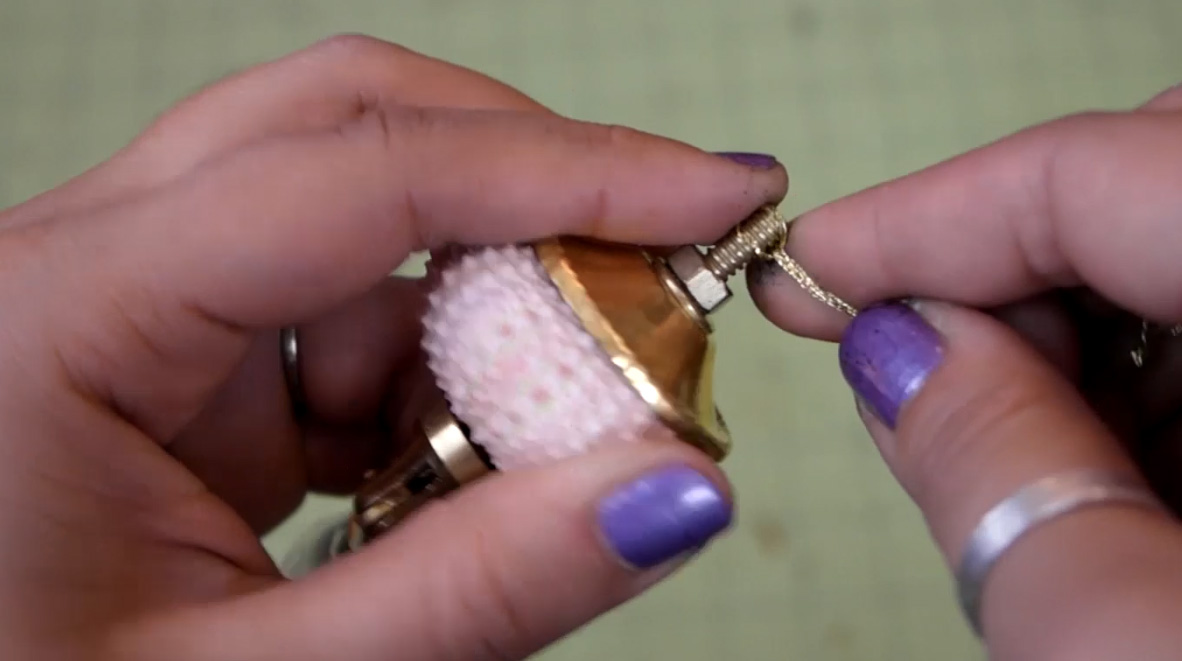
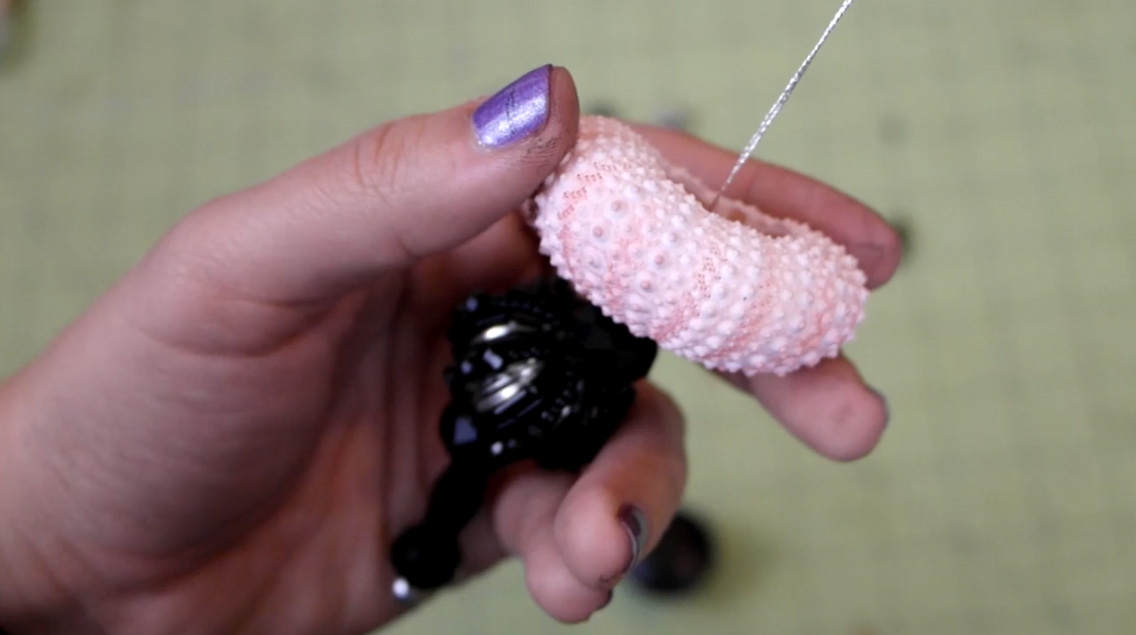
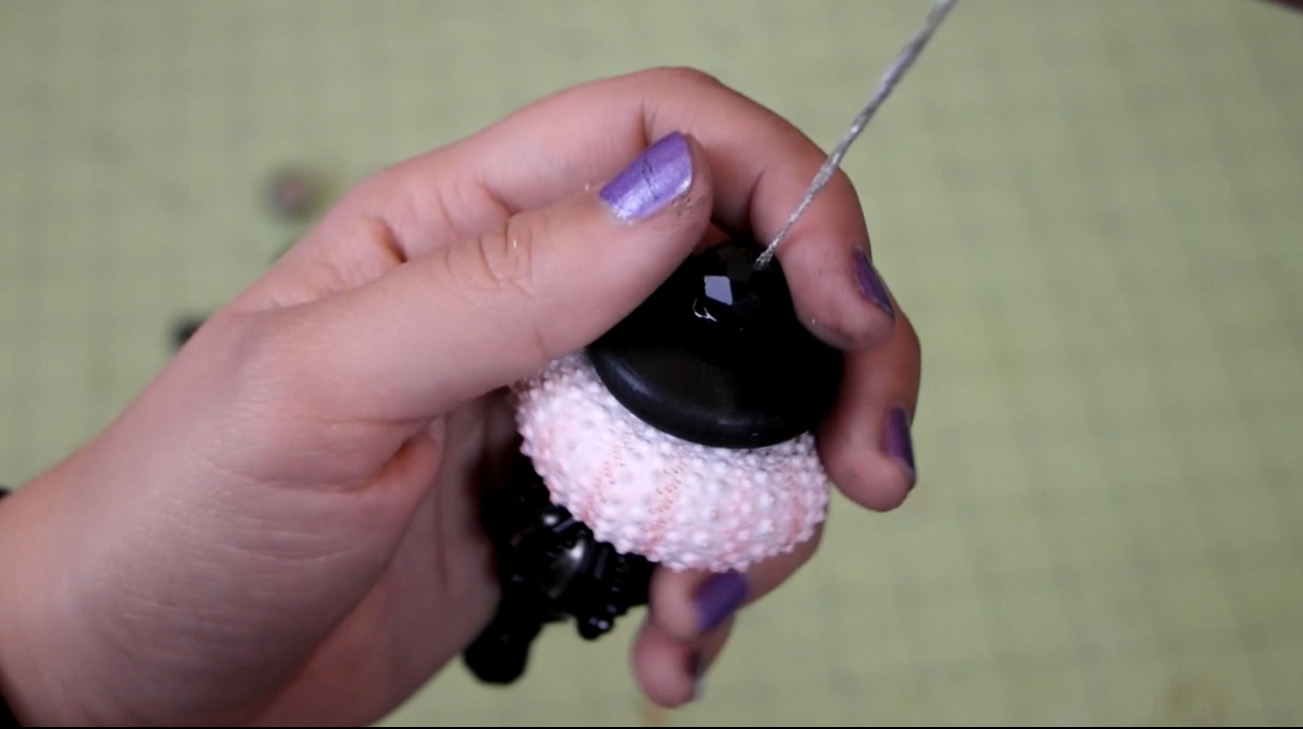
This is by far the easiest method. You're basically just screwing the drawer pull together around the urchin.
Hover over or click on the photos for instructions.


Hover over or click on the photos for instructions.


I hope you all enjoyed! If you have any comments or suggestions for future projects, please let me know!
And don't forget to enter for your chance to win a wood turned sea urchin ornament made by me!
chezlin ·
A few months ago my husband bought a lathe, so I decided I'd learn how to use it. I've learned what I know from a combination of him teaching me and watching youtube videos so there might be some things I'm doing wrong or could do better. If anyone has any tips for me, please let me know! My most recent project on the lathe was a finial and topper for a sea urchin ornament. I decided to take video and share it with you all! This isn't a tutorial video or anything, but if you're interested in the other ornaments that make an appearance at the end, I'll be posting a tutorial for those tomorrow.
Hope you enjoyed~
chezlin ·
A few months ago I came across a sweater that I totally fell for. It was the embroidered crane sweater from the Altuzarra for Target collection. I just loved the design and the placement of it, but of course, being the crafter that I am, I ended up talking myself into embroidering some of my own designs and throwing them onto a sweater to create something that has the same feeling like the original sweater. So today's project is going to be the embroidered appliqué that I made to attach to a thrifted sweater.
Keep reading for a video summary!
 Here's what you'll need. You'll want to cut the water soluble fabric and tulle to fit your embroidery hoop.
 Draw your design onto some water soluble fabric.
 Take the middle hoop and drape the black tulle and water soluble fabric over it and then push the outer hoop over it all and tighten the hoop slightly. You'll want to keep it loose enough to be able to pull the fabric in the hoop, but tight enough to keep it in place once you've pulled it.
Work around the hoop gently pulling the fabric taut. Then finish tightening the hoops all the way.
 Embroidery time! I was totally inspired by Michele Carragher's embroidery style. I'm not really going to go into detail about how to do this part because I was just kind of winging it and doing what felt right for that part of the design. According to my research I was using a combination of stem stitches, detached chain stitches and split stitches. And of course I added some beads and jump rings as embellishments.

 Here it is all finished! Well, the embroidery part anyway.

To secure the thread ends and to make sure nothing moves too much, paint a thin layer of Mod Podge onto the back of the design. It's important to use Mod Podge because once its dry it isn't water soluble so you wouldn't have to worry about washing the glue away whenever you did laundry. Tear off as much of the water soluble fabric as you can.
 Trim the excess tulle away leaving 1/8 inch on the edges.

You can see here where the water soluble fabric didn't tear away, so off to the sink I was. Under running water, gently rub the areas where the water soluble fabric is still clinging on for dear life. It will dissolve away.
 I made two mirrored embroidered appliqué designs and sewed them on the shoulders of a thrifted sweater.
And...
 Finished!
I hope you enjoyed this project! I actually like it a lot more than the original sweater I based this project on. This is my first major embroidery project so if anyone has any better techniques or anything like that for me then please leave a comment! :D
Stay tuned for some holiday goodness next week!
chezlin ·
I love beanies. Like shoes and scarves, I feel like you can never have too many. Since it's finally starting to get cold where I live, I thought I'd put together a few ways to spruce up some simple, plain beanies.
A summary of the video will follow!

For the first beanie I embellished it with two pom poms to give it a sort of teddy bear ear-esque look. Hover over the images or click on them to see instructions!

This second beanie mod is inspired by Korean fashion. One of my guilty pleasures is Kpop music, and I feel like I was always seeing the idols wearing cute beanies with really long bunny ear like bumps on top. I decided I needed to own something similar. And here it is! Hover over the images or click on them to see instructions!

This last beanie mod isn't reminiscent of any kind of animals like the last two were. This one is simply if you wanted to add a little edge to the thing. Hover over the images or click on them to see instructions!
And those are the beanie modifications I wanted to share with you all! I hope you all liked them. I'm super excited to add these guys to my beanie rotation now!
chezlin ·
Like a lot of crafters, I have an excess of crafty things laying around my house. Lately, I've been trying to work my way through unfinished projects and extra materials I have. I also recently got 2nd ear piercings so I've been very excited to make myself some earrings that will fit in normal ear holes! (I have my original ear piercings stretched a bit, so normal piercings fall right out.) So combine trying to use up crafting materials with the need for new earrings, and that equates to me making over 20 different types of earrings in one day. After the first few ones I decided I should document the making of them!

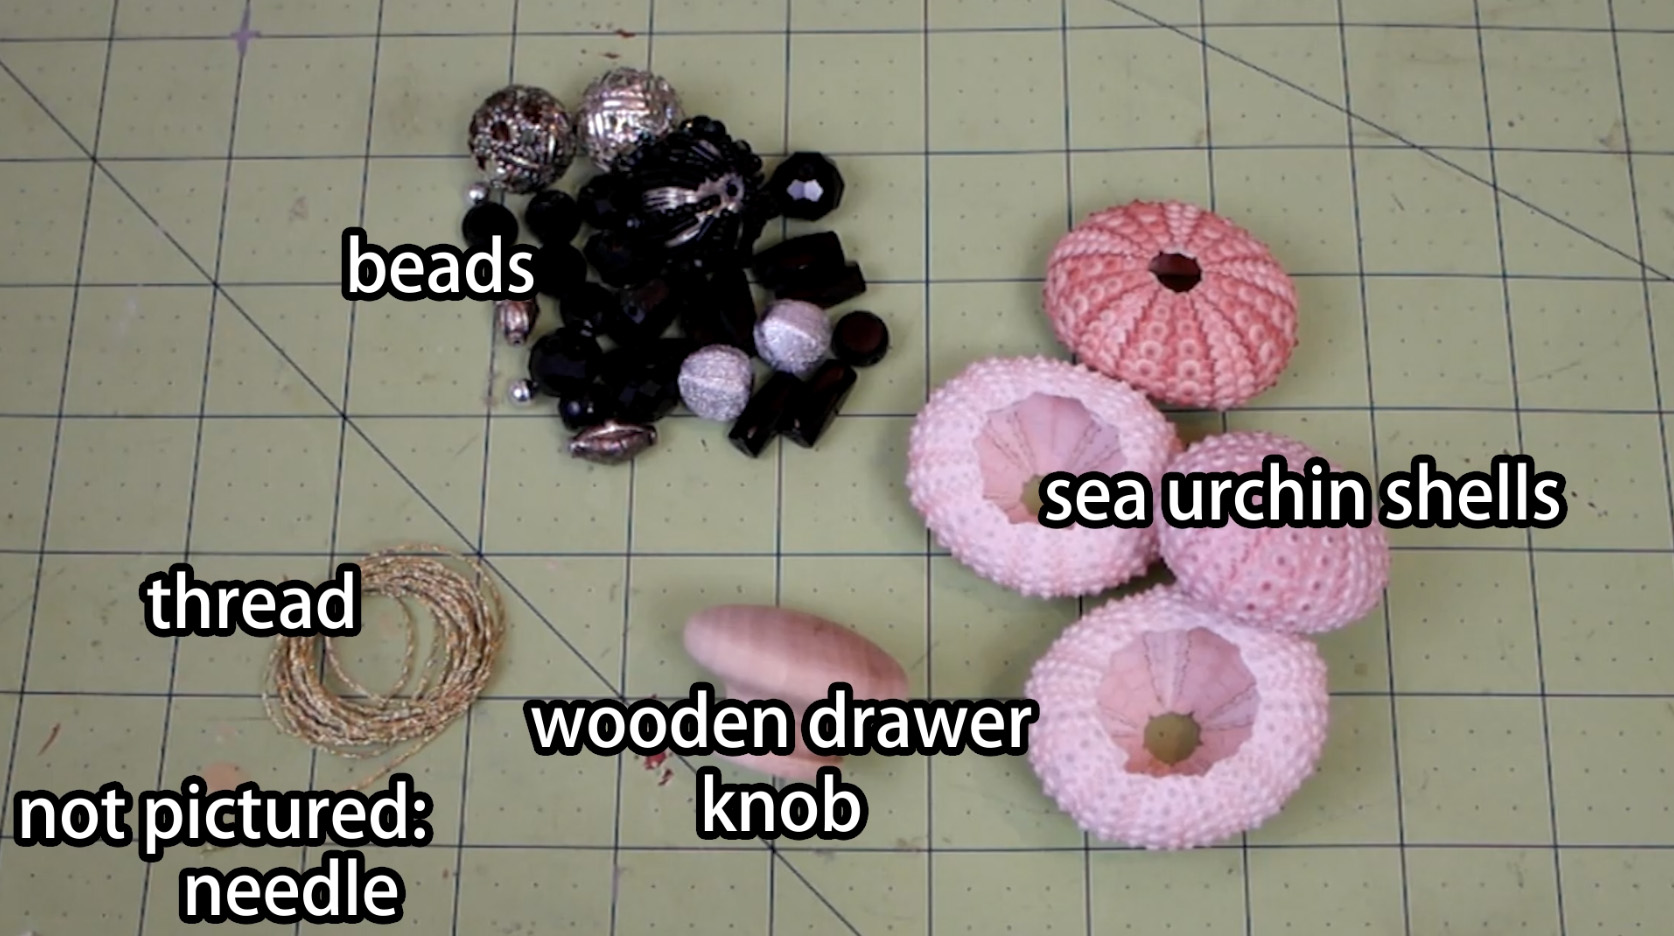
Here are some of the materials I used in the beginning. As I went on I slowly added more and more out of necessity.
Materials pictured are:
Materials not pictured:

At this point, I knew I wanted to make some pointy black earrings. Unfortunately I could only dig up my skin colored sculpey, so after researching online for a little bit, I saw that some people colored their clay with permanent markers. I figured I could give it a try!


I flattened out the clay and colored it black.

Then I just worked the clay until it was a solid color. I repeated this process until it was as dark as I wanted.

Here's the final color compared to the original skin colored clay. Pretty drastic change! I have to say, this method worked out very, very well. Will use again!
Now I'll do a play by play of how I made the earrings~

I cut equal parts of the clay and rolled it into spikes.

Using a sharp blade, I cut the top at an angle.

I made a few of these and I highlighted the flat area with various things like glitter and metallic pigments.

The lid had plenty of pigment on it, so I just rubbed the flat area around on it.

Ta da! I had to do the glittery ones after baking, so you shall see those in a few pictures.

I wanted to make some ombre earrings, so I just dipped the ends into the pigment, and using my fingers I smoothed and faded it out.

Ta da!
I wanted to make dangly earrings, but I only had earring posts like these:

So I had to be inventive. I figured I could take a small amount of clay and some open eye pins and make little studs that I could attach the dangly part off of.

Unfortunately I only had head pins. So I had to make my own open eye pins. Also, since the studs were going to be so small and I wanted to make sure the pin would stay, I made figure 8 shapes out of the pins and squished then into a small ball of clay.

Like so. Then I squished it onto the earring post to make the back of it flat.


I ended up baking them like this to make sure they'd stay flat and then carefully popped the posts off and reattached them with glue.
Anyway, after making all my random clay pieces, I threw them in the oven to bake. According to my clay I baked them at 275F for 15 minutes.

Done baking! Also, the picture quality after baking kind of suffered because a storm decided to blow in and engulf all the nice natural sunlight that is the key to taking awesome pictures. Now, I love me some good thunderstorms, but only when I'm not trying to take photos for my blog!

After baking, I took a paper towel and rubbed off the excess pigment. I originally intended to seal these pieces with a clear acrylic sealer, but I couldn't find my sealer(I must have left it back in Texas :( ) and they actually don't rub off any pigment at all after taking the excess off. I also ended up liking the matte-ness that the black clay ended up getting after baking as well.

As promised, here is the glittering.

I basically just painted top coat nail polish onto the area I wanted glittered (here being the flat part) and then dunked it into the glitter. I used my finger to gently pat the glitter flat and into the to coat and tapped off the excess. I repeated this process with the black glitter. After they dried, I glued on the earring posts using this fella:

A two part epoxy glue. A little goes a long way, especially with earrings (even with the mass quantity I did) but it does set quite fast so you have to work quickly. I ended up having to mix up about 3 different small batches of glue to do all these suckers.

Here they are all glued up! After curing for a few minutes they were set enough for me to attach the dangly earrings together, and I was done! Woo hoo!
(Note: you may notice the ombre spikes I made for the dangly earrings here in the front right of the picture. I forgot to mention that before baking, I made eye pins for them and stuck them in. Then, after baking, just to be sure they would stay in place, I took the pin out, dipped it in the epoxy glue and stuck it back in. I've had problems before with polymer clay jewelry slipping off of straight pins after baking, so I like to do this just to ease my mind.)

And these are some of them completed! I wanted to display them on my ears, but they're still healing so I can't take out the studs for a little while. So my hands will just have to do instead. And in the mean time I get to stare at these guys every day until my ears are healed!

Here are two dangly ones. I actually love how they all turned out and I can't wait until I can wear them!
chezlin ·
I was browsing through Craftster a few days ago and saw a super cute bracelet made by fellow poster milesapart714 that she made based off a $300+ designer bracelet. Her version was $3 and, in my opinion, much cuter. I just knew I had to make one. The next day I drove off to my nearest craft store and headed straight to the jewelry section. Everyone that lives around me must have had the same idea because all of the short chains suitable for this bracelet were sold out, so I had to settle on buying a 60" chain which was thankfully on sale! After gathering all the materials; chain, jewelry findings, a charm and embroidery thread my total came to $7 bucks. A little bit more expensive than milesapart714, but I now have enough materials to make a few of those bracelets and more if I really wanted to. Here are some pictures of the making of the bracelet:

All my materials gathered up. I used a darker silvery chain because it matches more of my stuff.

I taped the ends of the thread so it would be easier to thread through the chain

Here it is, finished!

Some close ups:


All in all, I wish I got a bigger chain but I do like how mine turned out.
I had some of the embroidery thread left over that was already bunched up and ready for more braiding, but not enough for another bracelet, so I tried my hand at doing something small... a ring! Here's a picture of it:

I hadn't sealed the knots yet with glue or clear nail polish because the bracelet didn't seem like it needed any, but the ring is already starting to unravel so I decided to be safe and seal them.
Big props to milesapart714 and her awesome tutorial! Check it out here: http://www.craftster.org/forum/index.php?topic=356098.0 and while you're at it, swing by their blog: http://www.studs-and-pearls.com/
chezlin ·
In order to get myself back in the crafting groove I've been doing some quick and easy things like making simple jewelry and little amigurumi. When I finish my crochet project I'll post it here, but for now I have an awesome bracelet to talk about. Almost a month ago Etsy ran a "How-Tuesday" where Simone Tan (a.k.a Groundsel) explained how to make a sailor's knot bracelet. I actually saw this post a few days ago and as soon as I finished reading it I grabbed the first skein of yarn closest to me and started to knot. Here is the finished bracelet:

It's kind of small and skinny because I just used normal yarn. I wanted to make something chunkier so I headed to my local craft store and bought some thicker silver rope stuff and some even thicker cording. Here it is with the silver rope:

This one is my absolute favorite and I've been wearing it every day since I've made it. The silver rope makes it look more "fancy" so I can wear it when I'm being more dressy as well as just wearing it casually.

Here they are next to each other on me. I think this style of bracelet looks better larger. This brings us to the cording.

This stuff is really thick, and unfortunately I didn't get enough of it to make a bracelet so that's going to have to come later whenever I find the time to go buy more of this stuff. Luckily it's only like .29 cents a yard! I think I'll probably make a fabric bowl with this cording I have now. I've been itching to make one for a while.
Sailor's knot bracelet tutorial: Here!
Fabric bowl tutorial: Here!
chezlin ·
I have been a photography nut for a long time, and I knew it was just a matter of time before my crafty side collided with my photographer side. Well this just so happened to take place just a few days ago when I found a website with instructions on how to make your own pinhole cameras. I was so excited that I ended up making three of their pinhole camera designs; two for me and one for my little sister. Unfortunately the first roll of film from their "Photos of Your Mother" camera was kind of a bust because I punched the shutter hole way too big. They say to use a needle to poke a small hole, but I shoved the needle through, causing the hole to be gigantic... for a pinhole camera. If the hole is too big the pictures will turn out blurry. You really want to just barely poke through with the tip of the needle. For shits and giggles, here are some of the photographs that came from that camera:


As you can see, the images are quite blurry and the spacing is way off, but with some tweaking I started getting those problems hammered out. The next camera I tackled was the "World Pinhole Camera Day Camera." Lucky for you, I documented myself making this one!


And thats it! I actually haven't finished the roll of film in this camera, but I did whip out a little matchbox pinhole camera and blew through that film really fast! I actually like the design of that camera more because the guy adds a little "clicker" that helps out with the spacing of the pictures. I don't have pictures of that camera, but I do have the pictures from it:


In these ones, the quality is better, but the vignette is pretty extreme because matchbox pinhole cameras have a pretty shallow body.
If you want to make your own pinhole cameras then you can visit Corbis Readymech Cameras for the quirky cameras or matchboxpinhole.com for a more simplistic camera. So far the matchbox camera was my favorite, probably because it was smaller and easier to just throw in my purse and because of the clicker mechanism that helps with the spacing of the photographs.
chezlin ·
I'm finally going to catch up with the times and get myself on Twitter. Unfortunately I couldn't have my good old name "Chezlin" because I was too slow to jump on the bandwagon. Boo, oh well. So if you people want to, you can now follow me @ChezlinTM. Keep a lookout for a new post coming up on Friday! :)
chezlin ·
I'm Filipino-American so I know a few silly Tagalog words here and there that my mom says now and then. My little sister and I like to combine some of these words to make completely nonsensical phrases. One of these gems is "Ay sus ginoo, sapatos puwet kugmo!" Any Tagalog speaker now should see that this doesn't really make any sense, but that's the point! "Ay sus ginoo" is an expression.. kind of like saying "oh my god." I'm often greeted with that expression from my mom when I'm just goofing around the house. The rest of it is literally, sapatos= shoes, puwet= butt and kugmo= booger. So yeah, as you can see, it makes no sense. Spanish speakers may notice the influence their language has had on Tagalog. Anyway, the point of this post is that my sister and I wanted to make shirts with this phrase on them. We would always talk about it, but never really do anything, so randomly I decided I was going to make mine at least... I didn't know what shirt she wanted to use, and I didn't know if she approved on the final layout of the letters.

Here's the printout.

Here it is after I got to exacto-knifing.

I spray-adhesived that sucker down.

Then I sprayed black spray paint everywhere. Notice that I had to do some more masking off with tape to avoid overspray.

The finished product. There's a little overspray on the neck, but I can live with it. I loved how it turned out anyway.
So that concludes my experiment with stencils and spray adhesive. I've done stencils before, but I'd always just kind of hoped they'd stay in place... I finally got my hands on some spray adhesive and used it! Since making the shirt, I've kind of abused it. I just threw it into the wash and dryer without setting the ink or anything, and it bled and smudged a little, but whatever, I'll still wear it.
Bedroom, For the Home, Kitchen
chezlin ·
So this post today is for two reasons. First and foremost, I made some kickin' rad one of a kind mugs. I got this idea thanks to craftster, roboarsonist. She used a ceramic paint pen by Pebeo called Porcelaine 150 and used it to draw some designs on a few mugs. Once I saw that I knew I had to try it. I went to Michaels and grabbed myself one pen and then to Goodwill to grab up some mugs and then went to town on them. Well, actually only two of them so far... and here they are!
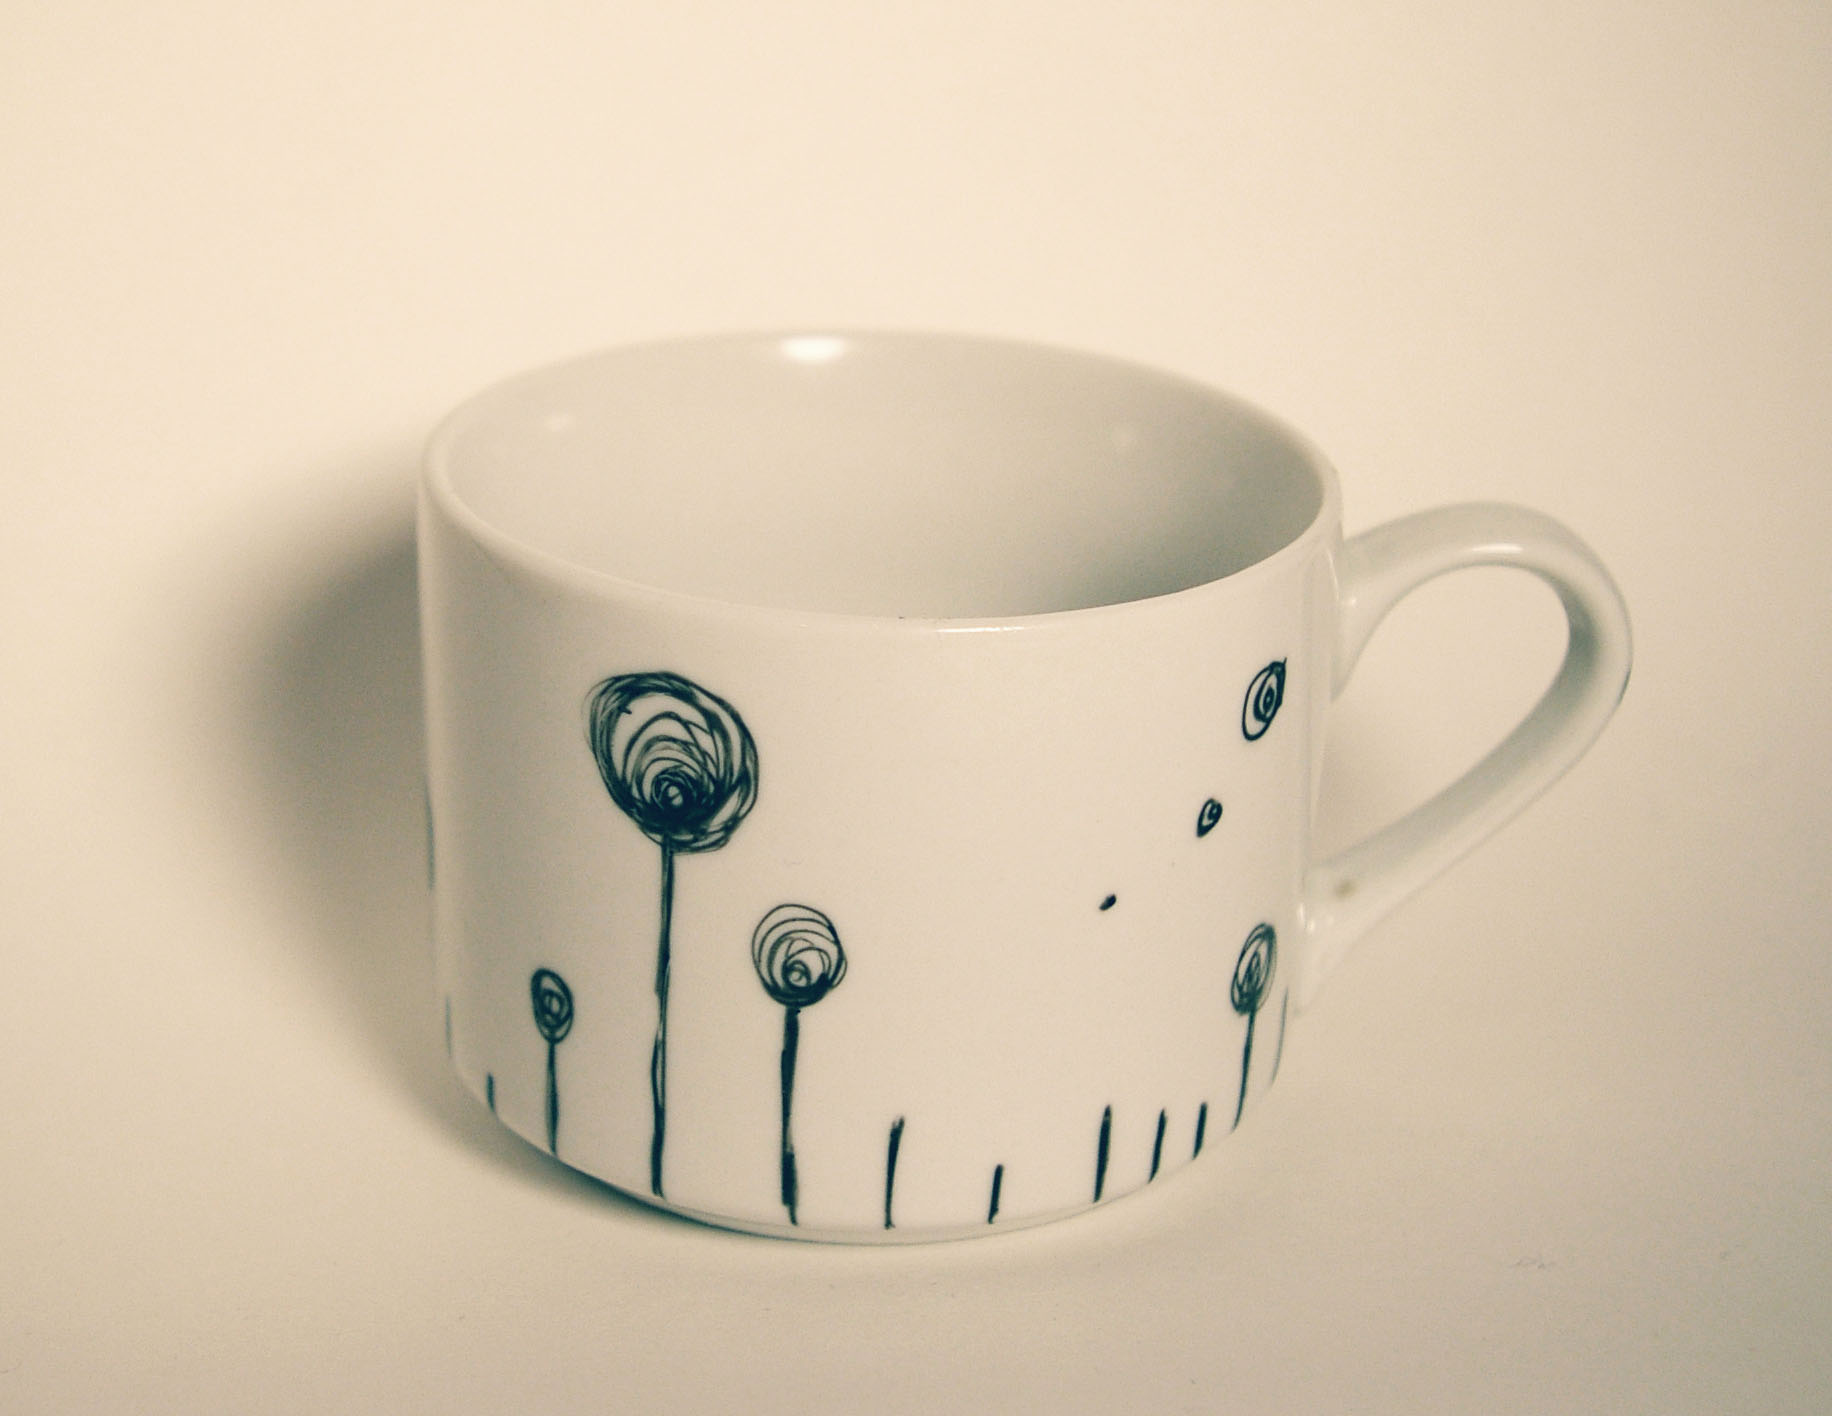
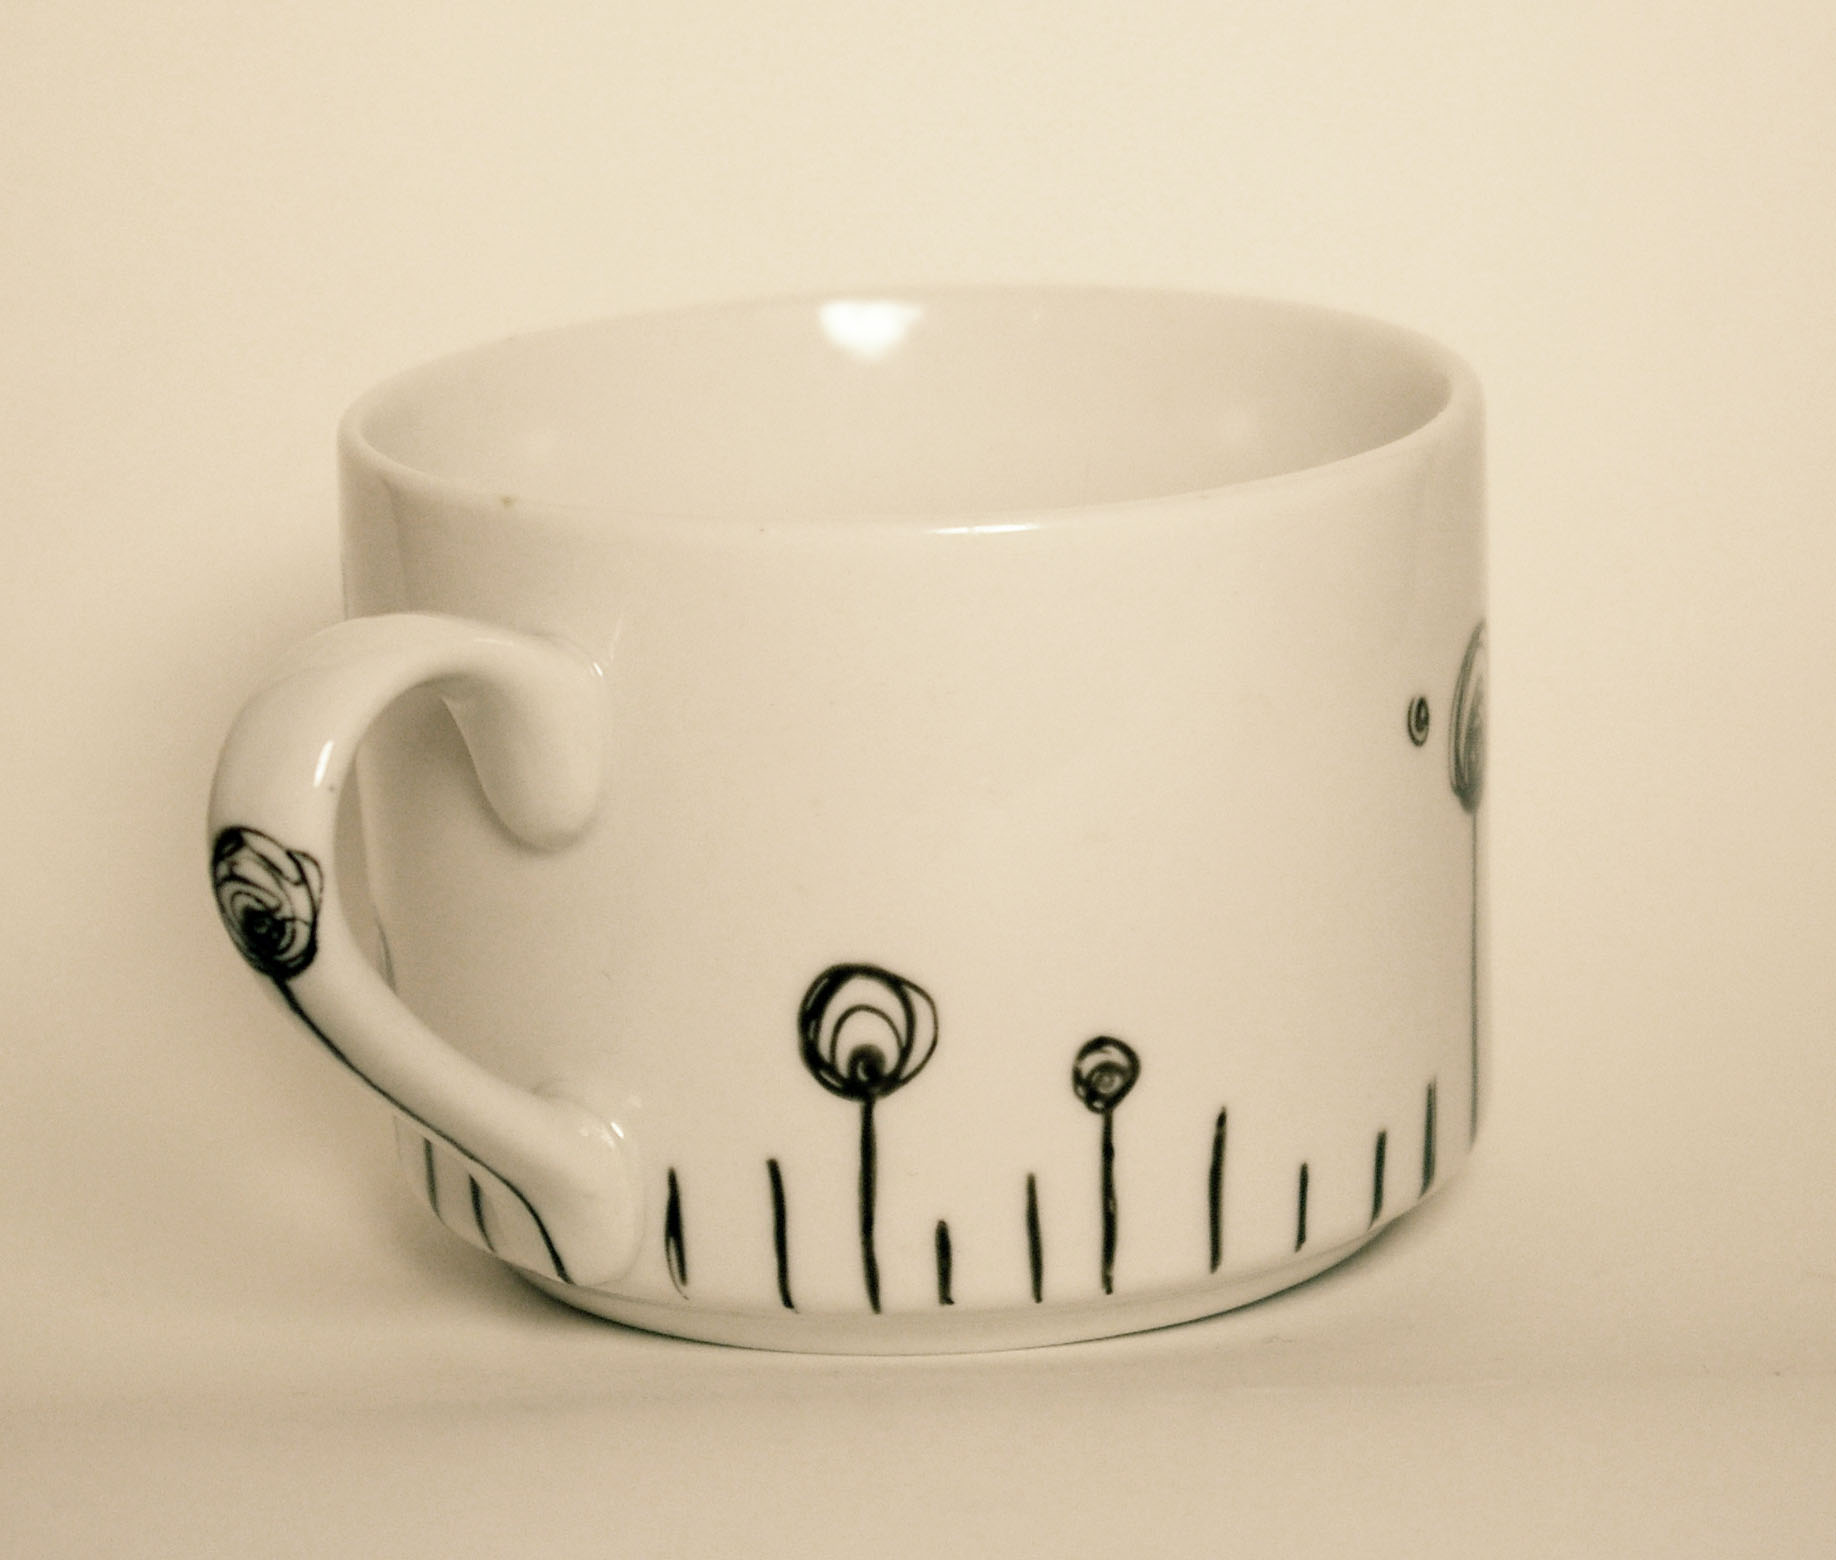
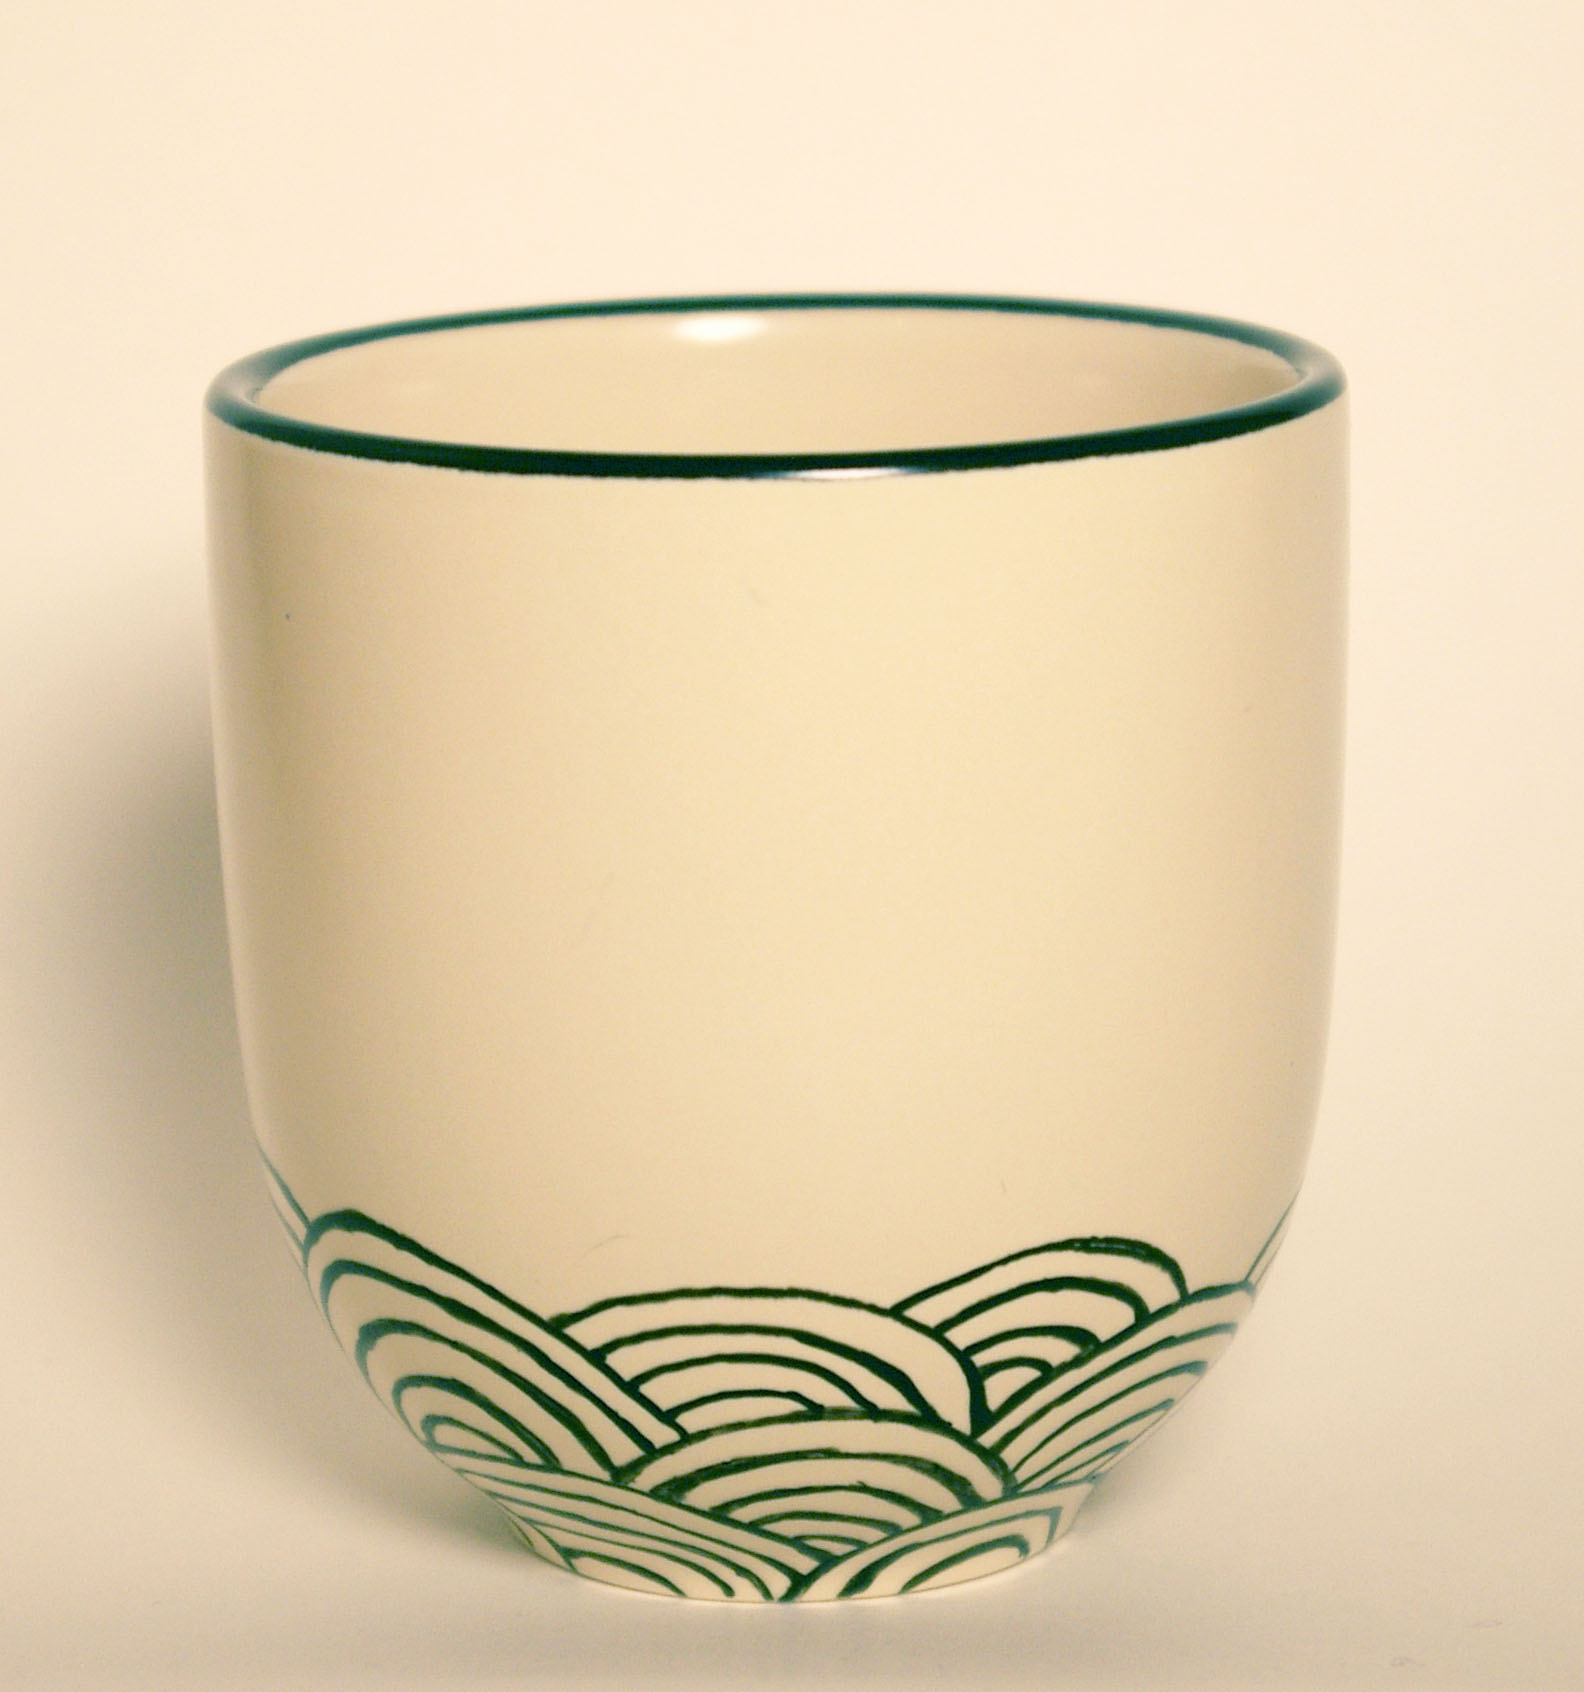
I really like doing this, although I think next time I'll get the actual paint instead of the paint pen.. The pen kept getting clogged and it was harder to get a nice consistent line with it. I'll post more about the paint after I get myself some.
So the second thing this post is about is that I finally started an Etsy store. It's kind of baren right now because I've been busy with school and stuff, but stuff will slowly trickle in as I have spare time to make stuff. I'm going to add these two mugs on it as well. :)
Here's a link to my little store:
chezlin.etsy.com
I still have a lot of work to do on it, but I thought it was time to show you all!
chezlin ·
A few weeks after using the original cassette tape wallets I made, I found out that they're not ideal for storing lose change. It slides out of the sides when you unzip it causing you to scramble around on the floor to collect your change. Or maybe that's just me.
chezlin ·
Phew, it's been a while! If you guys hadn't noticed, this blogging thing is pretty difficult for me to stay on top of. Hopefully soon I'll be able to post somewhat regularly, haha. :) I've done a few things between now and my last post.. one of the biggest things being attending the Austin Maker Faire.. and I know I'm going to be a few weeks late, but I'll eventually post a few of my pictures from there. I also made a duct tape dressform for my little sister and I've started a jacket.. which has been sitting in my room half finished for about a week. Oh yeah, I just made these awesome earrings, but you'll just have to wait for those pictures because this post is really for my... halloween costume!
I decided to be a wind up doll and I really wanted to put moving parts on it.. of course that would be the little key part on the back. All in all, I made a corset-ish type top, a simple circle skirt and an awesome petticoat that I love.. and will definately use again.. but I don't have any pictures of it because it's pretty see through. Last year I made a last minute petticoat with tulle and I just took a piece and gathered it so it was kind of like a tutu, but I really hated it.. it was uncomfortable and I didn't like the way it looked, so this year I decided to put more time and money into one so hopefully I could reuse it time and time again. I used this tutorial by sugardale but I shortened the length to fit the skirt. It was somewhat time consuming, took up a lot of thread, but overall I'm super happy with the result and I know I'll be saving it to use again and again!
For the skirt I also used a tutorial, but I cannot find the exact one I used right now, but there are pages and pages of circle skirt patterns when I searched google, so if you need one that's a good resource.
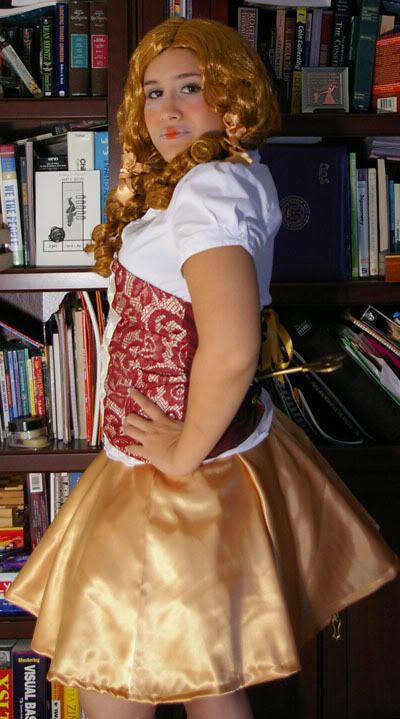
I'm not too happy with how the top came out.. I really wanted it to be a corset, but I just wasn't confident enough with myself and I just ended up sewing panels together and lacing up the back.. so it was somewhat like a corset. I refused to buy a pattern and tried to make one myself, which I regret doing, but it was too late to go out and buy one by the time I was making the top, so I guess I just lived and learned :)
So, I've been building up the anticipation to see this costume I've been rambling on about, so I present now, the pictures!
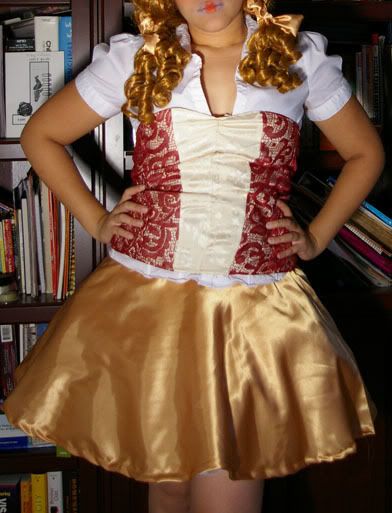

The makeup:


And finally, the part I'm most proud of with this costume... the wind-able key! httpv://www.youtube.com/watch?v=7alUNLzpOyo Testing it out.
httpv://www.youtube.com/watch?v=DdozzPiu9iU Actually on the costume.
So there's that. I hope you guys enjoyed it, unfortunately I'm the only one who enjoyed this costume haha, for the party I was going to attend didn't happen, so I spent all night on Halloween playing Little Big Planet. :)
chezlin ·
I'm not even going to try to come up with excuses as to why I haven't posted in forever... I'll just get to the good stuff. My little sister had some shoes she didn't really care for anymore, and asked if I could re-cover them for her. I had seen an article in Craft Magazine where they had done this so I knew it could be done.
Here are the shoes in question:

So following the instructions in that magazine, I whip out my exacto knife and start cutting.

Basically you cut all of the fabric off.. All of it! Also, not pictured is me ripping out the inside of the shoe. The bottom cushioned part.. thing. Be careful when you do this though, because you'll need them later.

The remains of the shoes. As you can see, I kind of rushed ripping out the bottom parts.

Next, I took the fabric she chose and used the old shoe fabric to make a pattern. You might not want to use markers here to draw it out... I just usually end up grabbing the closest thing to me when I'm doing this sort of thing.

I also drew out and cut the pattern out with the inside fabric, shown here. These are the tongues of the shoes. (I also cut them with the houndstooth fabric as well)

Sew those puppies up. I used the old fabric from the shoe as a guide for the decorative sewing.

Sorry, bad picture.. Me grommeting the holes for the laces.

A crappy, blurry picture of the new pieces with the old pieces. As you can see, I added a little more on the bottom of the tongue because I wanted to make sure I had enough. I ended up cutting off some when I put it in, but I figured that was better then not having enough!
More unpictured steps are where I glued in the fabric. I glued in at least 1/4 inch of the fabric all around the bottom edge of the shoes, glued the tongue in and finally the bottom cushioned part back in place. If done right, the fabric for the main part of the shoe should be sandwiched between the sole of the shoe and the cushioned part that was glued in last.
I waited for the glue to cure and whatnot before I laced them up because I didn't want to accidentally rip out the fabric.

What I did though, was put the shoes on (unlaced) to put some weight on the shoes so it would be stuck real good!

Ta da! All laced up and ready to go!
I'm hoping to take some better pictures of the shoes soon. When I do I'll make sure to post them up!
chezlin ·
Man, I haven't posted in a loooong long time.. I had to brush the dust off of this thing before I started this post! Haha. I apologize, I don't even have a real good reason, but I'll try to make it up to you with this post. I was trying to get myself out of this no crafting deal I had been having for a while by flipping through some of my old magazines for inspiration.. when I found just what I needed.

I saw this bag on the right, and I knew I had to make one. That bag, from Keen Footwear is actually made from woven rice paper, but I decided to do mine with fused plastic. I used a tutorial from the Etsy Labs on how to fuse the plastic bags. After that I just made a basic tote.. with some woven details. Here's what was created:

I apologize for the kind of crappy pictures, my nice camera is out of commision for the time being. Anywho, that's the bag.
Here's the back of it.

Here's some detailing..

Some more details.

The insides.

The zipper..

I usually just kinda put in the zipper without thinking about it too much.. which resulted in some not-so-pretty zippers.. but I found this wonderful tutorial on how to install zippers so they look oh so pretty, so now I use it all the time!
And that's it! I will probably be making more of these, it's a great way to recycle plastic bags.. You could also make some reuseable grocery totes with this technique.. I saw some that they were selling at target... way over-priced for me though, considering I can make some myself!
chezlin ·
A week or two ago, my little sister asked me if I could dye her shoes black because she didn't like the blue and red plaid. I finally decided to do it and share the process with you guys. This is my first time dying shoes, so I might have done some things strangely, so if there's any way I can improve, please let me know!

What I used: shoes, dye, a container, gloves, cotton balls(not pictured)
You need rubber gloves unless you want colored hands for a while.. I got a dye concentrate, so I just poured a little into the container and got going.

Here I am, about to start the dying process.

Oh yeah, here we go.

Pretty much done! And this is why you need gloves :)

Ta da! A pair of black shoes.
Thanks go to my older sister who dyed the left shoe as I dyed the right. :)
Again, I'd like to apologize for my absence lately.. End of school and whatnot has calmed down, so I should be able to start posting regularly again. :)
chezlin ·
I'm so sorry for my disappearance everyone! I had to run away to work on school work and whatnot.. finals week called for many projects, papers, etc. but now I'm all done! Yay! My older sister is done with college too.. cept not like me.. I still have a year to go. No, she's done completely! We're heading to her school to watch her graduation today, and I had a skirt I was going to wear but when I was looking at it last night and decided that it looked too much like a work skirt.. so I decided to make something to wear. I combed through my fabric stash and picked these:

I've had these for so long!
So I got to sewing and cutting. I had just vacuumed my floor and now I have to do it again because of all the seeds I had to cut off of this fabric so it wouldn't break the needle in my machine..
Here's the finished product!

Don't pay attention to the green shirt, it's just what I was wearing at the time haha.

Kinda blurry, sorry :(
Again, apologies for the lack of posting.. I have a lot of things lined up, I just never had time. I do now though! :D
chezlin ·
Sorry for the lack of posts recently, school is wrapping up so I've been busy with random papers, projects, etc. Hopefully soon I can start to post on a regular schedule rather than so randomly. Anyway, I finally had a little time to craft, so I decided to make paper. Exciting! Here are some pictures of my journey:

I took our paper scraps out of the shredder so I didn't have to rip up each piece of paper. I also soaked them for a few days... I meant to just soak them for 24 hours, but I got busy and I couldn't make paper for a while, so I had no choice but to let it sit there.
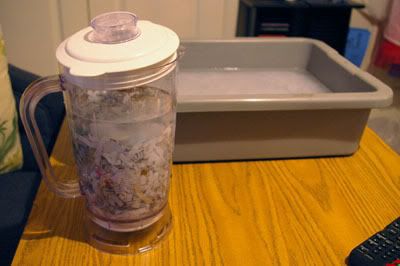
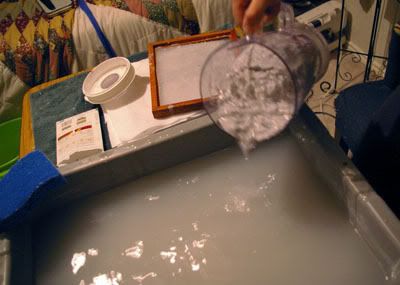
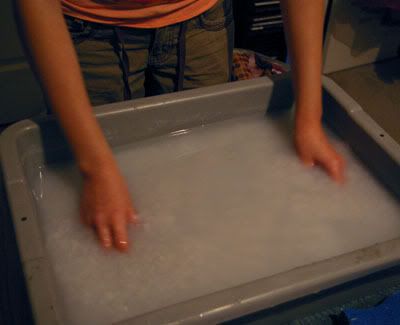
Fill the blender about halfway up with the paper mixture and then fill it up with warm water a little bit more than the paper. Blend. Pour into a tub that is already halfway filled with water.
Mmm, yummy!
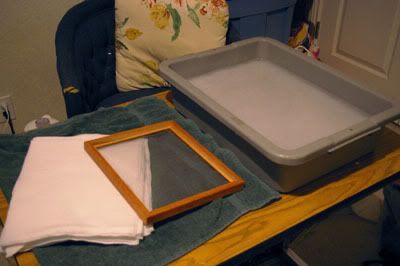
Here's what you need now.. your tub of paper-water, a few pieces of felt, a sponge, a screen and a piece of plastic that fits in the screen. I just made my screen with an old frame and metal window screen.
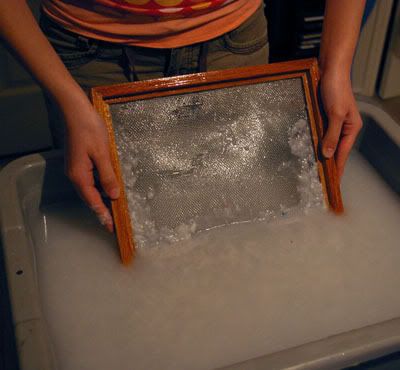
Put the screen in at an angle.. kind of like you're going to scoop up the paper-water mixture.
Straighten out.
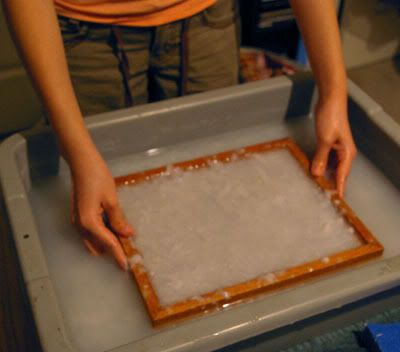
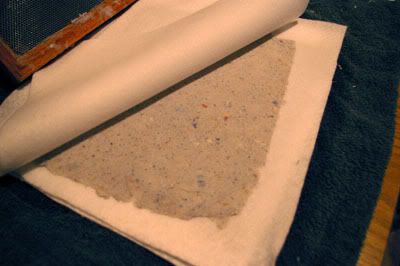
Pull the frame up slowly and as even as possible. Let the excess water drip out and put your plastic on top of the screen.
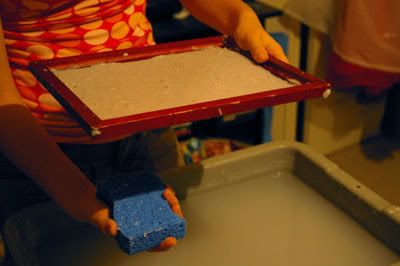
This part you would need two people.. You would really have someone holding the frame, and the second person putting one hand on top of the screen and pushing the sponge against it from the bottom to push the water out. Every few pushes you'll have to wring the sponge out.
Peel the plastic away from the paper. If it sticks at all then the paper has too much water in it still and you'll need to keep pushing it out. If it doesn't stick, and you get the plastic off the paper, flip it out onto one of the pieces of felt.
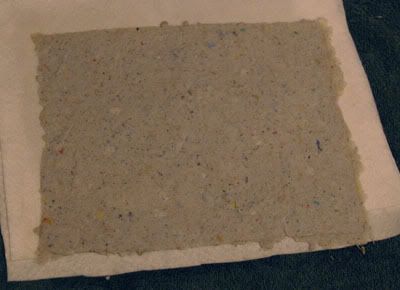
Like so. Put another piece of felt over this one.
Repeat and repeat and repeat until you're all out of paper pulp! I believe I got about 20 sheets from this batch. I put pressure on the stack of paper to get the extra moisture out. A lot of places recommend hanging up each piece with clothes pins at this point.. but I didn't only because I don't have any clothes pins :(
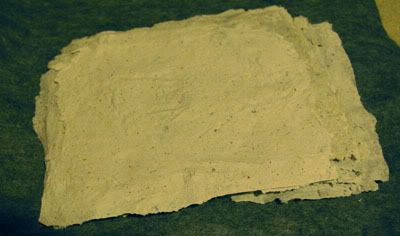
A stack of paper! ..wow, this picture is kinda green.
I'm planning on making a book out of some of these pieces of paper.. They just take forever to dry if you can't hang them! Making paper is pretty fun, you can experiment with different colors of paper, different consistencies, etc. Mine has a few random flecks of color and text dispersed throughout the paper, but I didn't really mean for it to happen.. I figured that after soaking for forever the paper would be broken down enough that it would be mostly gray. I'm happy with the result though.. it was a happy accident. :)