Other

For the Home, Other, Tutorials

DIY Faux Plant Desk Decor

This week I'll be showing you how to make some cute faux plant desk decorations. I decided to make these because my sister got her first internship and she needs decorations for desk at work! First I'll start off with the grass. I thought it could make a pretty neat looking pen/pencil holder. I wanted it to be long, so I'm going to cut the grass chunk in half.

-fake plants -scissors -sand -styrofoam -hot glue gun -pots -balsa wood -xacto knife -saw -paints/finish -ModPodge

First I'll start off with the grass. I thought it could make a pretty neat looking pen/pencil holder. I wanted it to be long, so I'm going to cut the grass chunk in half.

Now onto the succulent plants. I decided to make a little trio.

And now they're done!


Other, Tutorials

DIY Needle Felted Cat Toys

I've had some requests to do more cat projects and I've been meaning to put together a needle felting tutorial, so I decided to combine those two ideas together. So today I'll be showing you how to make some needle felted cat toys! I made three different types, one stuffed with cat nip, one stuffed with jingly bells and one stuffed with a crinkly plastic bag. -some wool -a felting needle -a felting surface - typically people use a foam block or a bristle brush but I'm using a burlap pillow thing I made. If you're interested in learning how to make one of these, stay tuned next week and i'll show you how! -some goodies to put in the middle of the toy. These are optional.

The reason wool fibers felt together has to do with how the fibers are made up. Like human hair, wool fibers have tiny scales all over them, however, the wool fiber scales stick out way more. So when the fibers are rubbed together, whether with hot soapy water, like in wet felting, or through stabbing with a felting needle, they hook on to eachother. So whenever you felt, essentially you're creating a big ball of tangled fur.  Also, you can't just use a normal needle to felt, you have to use a special needle. You can see here how it has little tiny hooks all over it and these grab the felt and pull them down, rubbing them against the rest of the wool fibers as you stab.

First, here's the cat nip stuffed toy:

Once you have the veins all attached and the leaf is felted nice and tight, you're done!

And now, the jingly bell toy:

Once it's felted tightly then you're done!

Finally, the crinkly bag stuffed toy:

And there we go, three types of needle felted cat toys!

The catnip laced toy is Gremlin's favorite.

I hope you (and your cat!) enjoyed this project! Next week I'll be doing a tutorial on how to make the felting surface, so stay tuned if you're interested!

For the Home, Other, Tutorials

DIY Faux Deer Head

091.jpg

First off I gotta say... Happy New Years! Welcome to 2015! Alright, back to this weeks project. I've always wanted to put up a faux mounted animal head in our house, but I could never find something that would work/was in the price range I wanted. I ended up giving up on finding the faux animal head and I made the flower curtain to go in that spot in my living room.

Well, of course not soon after I ended up finding the perfect head. Or almost perfect. Workable. I found a paper mache deer bust and it was on sale, yes! One of the antlers was broken off, but it was a super easy fix and they gave me an additional discount because it was the last one that they had. Double yes! I came home and got to work, and now I'm going to show you how to make your own!

suppliesSupplies.

01This step is completely optional. I wanted the head to have a bit more detailed, so I used some two part epoxy clay to sculpt in more detail. I also fixed the antler by popping it back in and then hot gluing it in place.

02Here it is all done being sculpted on! Looks pretty crazy right now, but it will make sense after painting.

03While I waited for the clay to cure, I added the hanging hardware. Just find the center of the wooden plaque and attach it there.

04Paint time! Paint the plaque and the animal head. I used white gesso because it has a matte finish which is what I wanted for this guy. I'm also going to use liquid gold leaf for an accent color.

05Once dry, mark out where you want the accent color to go. I did mine about halfway down the antlers.

06Paint time again! After I painted this part, I went back and added a few drip details.

07Use hot glue to attach it to the wooden plaque.

08Since the deer head was paper mache, it wasn't perfectly flat on the bottom, so when I attached it to the plaque there was a huge gap in some parts. If you have this problem, you can simply squeeze in some hot glue and then paint over it with your main color and that will hide the gap!

And then you're ready to hang!

09

Here it is in all it's glory. I took the flower curtain down and put this guy up in its place. I like it so much better than the curtain! What do you guys think? Let me know down below!

Alright, so now it's time for the giveaway winner! Congratulations blog reader Nicole!

Screenshot 2014-12-31 12.42.45

I will be sending you an email today! Make sure you reply as soon as you can because if you don't get back to me within 48 hours I'll unfortunately have to redraw a different winner.

For the Home, Other

Cat Shelves

It's no secret I like to spoil my cat. A while ago I made him a cat tree to give him a space to get away from our (at the time) new puppy. Well now that puppy is a decently big dog and he can reach Gremlin's little cat tree sanctuary, and while Grem normally doesn't mind too much(Hobbes is like a annoying little brother) I still wanted to give him his own space to get away when he wants to. I also wanted to put Grem's food and water bowl up a little higher because Hobbes love that stuff and can still get to it when it's on my dresser. So I made one shelf with recessed food and water bowls and two more simple carpeted shelves. A quick video summary will be below!

01Supplies. And how to cut your wood.

03I did miter joints, so I cut the wood at an angle for the corners.

04Figure out the placement for your food and water bowls on one of the shelves. Measure the size of the lip of the bowl (mine was 1/4 inch) and use that measurement to draw out another, smaller circle in the middle. You want to cut the wood out on that circle so the body of the bowl fits, but the lip doesn't, so the bowl rests nicely inside.

05Cut the circle out.

06Time to assemble! Use wood glue to stick the wood together and use the stapler to tack the wood in place with brads or finishing nails. You're going to attach the 32inch long piece to the 32inch side of the large piece of wood and then a 10inch length of wood on each side. Leave one side bare since it will be resting against the wall.

07Finish the wood according to instructions. I used a dark stain.

08Cut a piece of carpet out that's 32in by 10in. This is leftover remnant carpet I got for the cat tree. I still have so much left over...

09Attach the carpet. I put down some wood glue first before laying the carpet down. I honestly don't know if that even did anything because I followed up with about a million staples, but it made me feel better so I did it. So after you lay the carpet down use your stapler to staple the carpet down. I made sure to use a lot because I figured Gremlin was going to use these things as horizontal scratching posts and I didn't want him to be able to rip the carpet off.

10Here are the finished shelves! You can see the recessed bowls. I'm so happy with how they turned out!

11Now hang up on your designated wall! I really wish we had splurged on nicer looking brackets, but oh well. They're up already so I just gotta deal with it. I can always change them later!

12And here he is enjoying his new cat shelves!

I'm so happy these turned out pretty much exactly like how I pictured them in my head (beside the ugly brackets).

I hope you all enjoy, and I hope my instructions were clear enough! I didn't realize how hard it would be to explain wood working stuff.,. hah!


For the Home, Other, Tutorials

Flower Curtain Wall Decor

It's finally getting a bit chilly here and finally feeling like fall, so it's put me in the mood for all the autumn things. First things first, some decoration. My original intention was to make a wreath, but after getting my supplies home I changed my mind and decided to make some hanging wall decor instead. Here's how I did it!

Keep reading for a quick video recap below!


Supplies:01

02Cut all of the flowers apart.

03With the flowers I bought, the leaves were loose so had I superglue them in place.

05Find the center of a flower, squirt some hot glue in the middle and stick the end of a stem into it. Hold until the glue is hardened.

06Repeat until the strand of flowers is as long as you want. I made mine four flowers long. Repeat to make as many segments as you need for your branch size. I made nine.

07Tie a length of string onto the stick and then to the head of the top flower of one of the segments.

08Repeat until you've attached all of your segments. I tied mine about three to four inches apart.

09Here it is over my tv!

10My branch was pretty lightweight and adding the flowers didn't add much weight to it so I was able to just hammer two nails in the wall and rest the branch on those.

11If your branch is too heavy for that method, you could tie a piece of twine or yarn on each end of the branch and hang from a single nail like in the image above.

Hope you all enjoyed this project! I love it. I have a feeling like this piece is going to stay up on the wall for a while!

For the Home, Other

First Real Reupholster Project

I've always kind of toyed with faux-upholstery because I've been too intimidated to try a real project.

I was always scared that I would end up taking the fabric off of the chair or couch and then immediately become overwhelmed and then push the torn apart furniture to the corner of the room and avoid it for weeks or months while I try to regain enough courage to attempt it again.

I ended up finding this awesome tufted wing back recliner chair at my local thrift store, and before I even had figured out a way to get it home (no way it would fit in my little sedan) I had already bought it. I mean, I couldn't pass it up. A recliner chair that didn't look like and ugly lump? Of course I wasn't going to let it go! If I had to carry it back home I would have. Thankfully I was able to have a friend to come with a truck. Which is great because I also nabbed a great credenza that was half off... but I digress. When I bought it I knew I was going to have to reupholster it. It was covered in a blue pleather/vinyl type fabric that had a strange/gross thin film of... something over all of the chair. It was pretty bad. Since I wasn't going to be able to re-cover it right away, I ended up just scrubbing at it with a bunch of cleaners to get as much of the film off as I could.

399299_10103433185306000_1860770004_nI tried to find a picture of it before I started the project, but this is the only one I could find. This is it in my living room.

SAMSUNG CSC

Here I'm about to start disassembling the chair. Nerve racking!

SAMSUNG CSCHere I was thinking, "Ok, this isn't too bad..."

SAMSUNG CSCSome of the scrap from the chair. I should mention that this process was disgusting. the film that covered the whole chair had accumulated in each fold and crevice of this thing. My husband and I came to the conclusion that perhaps this chair was in a smokers home or something.

SAMSUNG CSCI carefully took each piece off. I wanted to make sure I could lay them out onto the new fabric to use them as patterns. At this point, even though it as pretty gross dealing with the nasty existing fabric, it was extremely satisfying to take the chair apart. I was having a lot more fun than I thought I would.

SAMSUNG CSCAnd then suddenly there was no more fabric for me to rip off anymore. And the reality that I was going to have to cut new pieces and stretch, tuft, sew, etc. them onto this naked chair started to sink in. And then the urge to slowly push it into the corner to let "future Rachel" deal with it started to bubble up. Thankfully, I was able to push that feeling back down and soldier on.

SAMSUNG CSCThere we go! Looking better already! Almost done! Not. At this point I was really panicking--was I really going to be able to do this? Sure I tufted that headboard before, but this felt very different for some reason.

SAMSUNG CSCOk, first tuft... not that bad. For the buttons I bought some button making kits and made a few with the new fabric.

SAMSUNG CSCOkay, okay, this is looking so much better. I was feeling better at this point.

SAMSUNG CSCAnd here I was thinking, "Oh my gosh, I'm doing it. I'm really doing it! And it's actually looking decent! This is actually pretty fun!" And then I remembered I had to sew up some arms lined with piping.

SAMSUNG CSCWith the previous pattern pieces I knew that I had some leeway as long as I cut more fabric than the previous pieces. Since most of this project involved stretching a bit of fabric on the chair and stapling it down, as long as I had enough fabric to staple I was fine. I could then just trim off any excess. I didn't have that luxury with the arms. Since I had to sew them to match the wing back shape I had to be very precise when transferring the pattern. It took a few fittings and adjustments, but I finally ended up getting them to work!

SAMSUNG CSCOh man, and here it is, all finished(well almost)! This fabric is so much nicer than that crappy sticky gross vinyl that was on it originally. It's so soft and it makes the chair so comfortable.

SAMSUNG CSC

Here it is reclined.

SAMSUNG CSC

And here's some fancy close up shots.

SAMSUNG CSCThe arm. Technically this chair is unfinished because I haven't put in the upholstery tacks yet. I have them and they're ready to be hammered in place, but I'm just being lazy about it.

1467401_10103862891261820_1812994132_n

And here it is in the room after re-covering it. As of right now, it's my favorite chair. It's so comfortable even in its normal state, it's a huge plus that it also reclines as well.


I hope you all enjoyed seeing me struggle through my first real reupholstery project. I didn't really know what I was doing, I was winging it a lot and probably did a lot of stuff wrong, but it looks good so that's all I can ask for!


For the Home, Other

Homemade Cat Tree

feature21.jpg

Oh hey, it's been a while. I made this a while ago, but surprise surprise, I'm just now getting around to posting it. :) I've been wanting to make a cat tree for a while but I had been very wishy washy about actually getting off my butt and doing it. However, after I saw a picture of one made with tree branches that looked super cool, I finally got the fire under my butt to go and make one(and to force the fiance to help!)

SAMSUNG CSC

Gremlin is spoiled.

CTH0007 Deluxe Seedling small

This one is the tree that inspired me. I loved that it was made to look like an actual tree. However, it cost like $700. So of course immediately i thought, "Psh, I can make that." And you get to see just how I did.

IMG_20130717_125119

I was lucky enough to get inspired right after they cleared the empty lot next to my house, so there were plenty of decent sized tree branches for me to sort through. Here are the winners.

IMG_20130719_132305

Then I had to trim the branches to size. I love my pull saw!

IMG_20130720_154727

Here are all the pieces ready to be put together. Unfortunately I didn't get any pictures of me making the carpeted components. Basically I made a base and a platform out of plywood and covered it with carpet. (Remnant carpet, ftw!) For the half cylinder platform I took a concrete tube mold, cut it to size and then in half. I hot glued the halves together to help make it stronger and then glued the carpet on.

IMG_20130720_155714

Here's where my fiance had to step in to help. After eyeballing where I wanted the main branch to be, I carefully tipped the branch and base over so he could drill through the base and into the branch from the bottom. We ended up screwing in a pretty decently sized screw to hold it in place and then reinforced it with smaller (but still pretty substantial) screws. My cat is a big boy.IMG_20130720_165030

And just a few screws later!

But really, we didn't get any pictures of us assembling the rest of it sadly. This part was all pretty much just trial and error. We'd place something and see how the other components would fit in and we adjusted the pieces until it was to our liking. Basically we just attached the shorter stumpy branch onto the base just like the first one and then screwed the platform onto it and into the tall branch. The carpet hides the copious amounts of screws we used to keep that thing in place.

I positioned the thin branch on the platform so that it helped support the top platform and we screwed all those in too. I then took the drill and drilled a few random holes into the branches and stuck some fake leaf branches in them. Initially I was going to hot glue them in place, but the drill bit I used made a hole that they fit so snugly into that I didn't feel the need for the glue. If Gremlin ends up pulling any of them out then I can just glue them back in later.

IMG_20130720_165431

I wrapped the short stubby branch with sisal for a nice scratching area. Which he has yet to touch even still. IMG_20130720_170656

So since my cat is a big burly man-cat, I decided to make his tree pretty with flowers. I hot glued those suckers on and prayed he wouldn't see them as toys and rip them off. (Which is totally what happened. Oh cats.)

IMG_20130720_171531And here it is finished! Complete with the I'm-too-excited-about-how-this-turned-out-and-I'm-going-to-take-a-picture-before-I-even-clean-up mess everywhere.

IMG_20130720_172750

The tree fit perfectly nestled into the corner of our bedroom. Later, I ended up fluffing out the leaves so they didn't look so... flat. IMG_20130720_173425

Gremlin is unimpressed.

IMG_20130720_180128

And then a short while later I passed by and saw this! I think he likes it!IMG_20130720_210914He enjoys the top too :)

It took about 2 to 3 days of working on it off and on, it's about 5 feet tall and it cost under $100 to make. I love it!


For the Home, Other

Painted Couch

Well, it happened. I joined the ranks of the crazy people who looked at their couch and thought, "I should paint that." I had seen a few examples of people painting their couches online, and after reading all of them, I decided I would just forgo the textile medium and just use latex paint. My reasoning was that latex paint was already very flexible, so I wouldn't need the medium for that. Also people use the medium to heat set the fabric, but from what I know about that stuff, it's to set the paint so it doesn't wash out in the washing machine. And I'm not throwing my couch into the washing machine any time soon. This whole thing happened when I went to Goodwill to look for a coffee table or dresser. So of course I found an awesome love seat and couch that I couldn't just leave there. The only bad things about them were the grandma floral fabric and broken springs. Both easily fixable. I made sure we would be able to get them home somehow (we have a small sedan... not really fit for transporting a love seat and a couch) and then bought those suckers. Here's a breakdown of this project:

Love seat and couch - $115

Uhaul(we need a truck...) - $55

Oops paint (grey, eggshell finish) - $5

 Total - $175

Really, I only painted the love seat, so I didn't know if I should include the couch in the prices and everything, but I did anyway. If you wanted to split up the couch cost and Uhaul cost between both couches, it would be around $90 for this love seat project. Anyway, here's a picture of these guys at Goodwill:

I didn't get any other decent before pictures of the love seat unfortunately because I was so excited about ripping the bottom out to fix the springs. I didn't get any pictures of that process, but it was pretty easy. I removed the legs and the fabric on the bottom and it revealed that one of the serpentine springs had come loose. Easy fix. I just used some pliers to work it back into place. I'll try to get some pictures of the big couch when I work on it so you guys can see what I'm talking about.

I had planned to paint the legs so when I had taken them off to fix the springs, I slapped a few coats of some white spray paint that I had laying around. I ended up leaving the legs off the couch for the entirety of the project so I didn't have to worry about taping them off.

Here is everything before I started painting. I got some "oops" paint from Lowe's for just $5. It was almost $20 off. Super awesome deal, it was in the color I wanted, the finish I wanted and was the only miss-mixed paint that they had at that moment. It was meant to be.

I knew I had to take it slow... I wanted to err on the side of more layers rather than less. Patience is rewarded. If I had just tried to slap it all on in one coat, it would end up blotchy and uneven. What I ended up doing was three layers. Layer one was about half water and half paint. Layer two was about 1/4 water and 3/4 paint and the last was only paint. This process worked out well for me. Of course, I cleaned the crap out of this thing before painting. It took a while because the couch has deep tufts and a lot of wrinkles and folds that I made sure to really get in to.

First things first, I took a small brush and tackled the tufting. I made sure I pulled each fold open and painted in there too. I didn't want people to sit on the couch, only for the folds to shift and expose flowers underneath the grey.

After getting in to the tufting and folds, I painted one layer over the whole couch. For the broad areas of the couch, I used a foam roller.

Day one, layer one. You can still see the colors from the fabric showing through.

Day two, layer two. Getting better. The fabric isn't showing through -as- much, but the paint is also pretty blotchy.

Day three, layer three. Pretty much right after painting. The wet paint is slightly lighter than what it ended up drying to. I waited a day to make sure the paint was completely dry, and then reattached the legs.

And here she is! I love how it turned out. It has a neat texture now. It's slightly shiny and at certain angles you can see the flower pattern of the  fabric. Not the colors, mind you, but the way the fabric was woven.

A lot of people question whether or not painting a couch is a feasible option because they think the fabric will get "crunchy." I knew this was a possibility, but I figured that since I wanted to change the fabric anyway I could just try this painting thing out and if it didn't work I could just reupholster it, especially since the paint I got was so cheap. As of right now, the couch is kind of "crunchy" but it's been getting better as it's being used, which I expected to happen. So for the foreseeable future, this thing is staying painted.

All in all, it was a neat project that I saw somewhere and knew I had to try for myself. The original plan was to paint both couches, but I've recently decided that I wanted to try my hand at reupholstering the big couch. I thought it would be a neat dichotomy to take the matching couches and show an example of the painted couch, and an example of a reupholstered couch.

I hope you all enjoyed my painted couch journey!


For the Home, Other, Tutorials

Letter Pillows

I've been itching for some new pillows for my awesome couch, and I ended up coming up with the simple idea of just using my boyfriend and my initials. And an ampersand. Here's how they turned out:

And I also took some progress shots for you all and will walk you through how to make these suckers.

Draw your letters out on paper, cut them out and arrange them onto a piece of fleece or felt. You want to use a fabric that won't fray on the edges. I used some leftover fleece i found in my fabric stash.

Realize that if you're going to trace them out, you want the outline marks to be on the back side of the letter so it won't show. Flip the letters over and rearrange them again.

Cut them out! (I added the little dot for the 'j' in the middle of the letters, there.)

Admire your beautiful letters.

Align your letter in the middle of your pillow fabric and pin it down. (I made my pillows out of 16 by 16 inch canvas fabric. You can use whatever you want. I just ended up using whatever plain colored fabric I had.)

Sew it up! For added interest, use a nice contrasting colored thread. I used a lime green thread.

Admire your beautiful sewing skills. Put the right sides of your pillow together and sew up the edges leaving a few inches open. Flip it right side out, stuff it, sew it closed and you're done! Yay, look at your pillows!

Here are mine arranged on my couch. I love them!

For the Home, Other

Making an Ugly Sofa Beautiful

A few months ago, my boyfriend and I uprooted and moved one state over.  It was fairly short notice, so we just packed as much as we could into an SUV and drove to our new apartment. The only "furniture" we could fit in the car was a fold up table, tiny folding chairs and a blow up mattress. After living like this for a few days, I was finally able to go out to find a sofa. I ended up finding this nice camel back sofa with lion feet legs.

Isn't it beautiful?! Not. It had the ugliest slip cover, but a quick glance at the underlying fabric and I fell in love.

This is the story of how this ugly sofa turned into a beautiful piece of furniture.

I really wanted a darker colored sofa, but I figured I could paint it a la this tutorial and still have the pattern of the fabric show though. Unfortunately, when I got the couch home and removed the slip cover completely, there were a few problems.

The cushion was only covered by the fabric from the ugly picnic slip cover fabric. Yuck. While I brainstormed about what I could do, I just wrapped up the foam with an extra bed sheet cover. You probably noticed that the cushion looks bigger here than in the first picture, and that is true! I was able to score 4 pieces of high density upholstery foam for just $40. I was so excited. I ended up using two pieces on the couch and I'm going to use the other pieces to reupholster a little chaise lounge I got. But that will be a different post.

But back to updating the sofa - the first thing I thought I could do was to stick with the original plan and paint the couch. I figured I could paint it and then buy enough (almost) matching fabric to make a new cover for the cushion. Sadly this couldn't happen because I noticed small tears in the fabric that would eventually tear more and more as we used it. That must have been why they slip covered it in the first place.

The second thing I thought I'd try was to attempt to dye the slip cover black. I felt as though that was the only color that could cover the ugliness of it or at least tone it down so the plaid wasn't too bad (a.k.a. too noticeable). After ordering a bunch of dye only to accidently lose half of it down the drain before I even started dyeing the fabric and then having the fabric not take any of the color (yay for rushing things and not figuring out what kind of fabric it was) I decided to try a different tactic.

I found this tutorial and thought that this is the one that I'll do and I will make it work no matter what. I ordered quite a lot of this dark purple upholstery fabric and got to work.

I cut up the slip cover to make a rough pattern for the pieces and to take out the piping cording so I could remake piping in the new fabric. This picture shows after I sewed on the arm pieces.

And here it is almost done! It stayed like this for a while because, even though it was only a few straight lines I had to sew for the cushion, I kept psyching myself out. I only had enough fabric to attempt this once, and I was sure I would mess it up somehow. Eventually I decided to get the cushion done, so I glued the foam together so it would appear to be just one big piece of foam, I crossed my fingers and sewed up a huge rectangle. Thank. God. It fit. I had to enlist the help of the boyfriend to get the cover on, as the cushion is a foot taller than me, but we crammed it in there and it ended up being a perfect fit.

And here it is complete (or almost... I'm really tempted to paint the legs white)! I love it so much! I wish I had just skipped the whole dyeing debacle and went straight to this, but it all worked out in the end.

Other, Tutorials

Fancy Magnetic Pin Holder

I had never really thought too much about how I stored my pins.  I'd keep them in the little plastic box thing that they came in and of course, whenever I'd open the thing, I'd pull on it too hard and end up tossing pins all over my work area.  I would always tell myself I should really get better storage for them and finally I did.  While lurking around on the internet I found a few examples of people taking dishes and gluing a magnet underneath so you could toss your pins in it with no worries.  I thought it was brilliant and ran to Goodwill to snatch up a small dish to use!

Here are my materials.  A soap dish, a very strong magnet from an old harddrive and my handy dandy E-6000.

I had originally intended on getting a dish with a foot that was sunken in more so I could glue on the magnet and have the dish sit flush, but there weren't any dishes like that available and I wanted to make it NOW!  So I grabbed this soap dish will the intentions of cutting out the bottom with a dremel tool.  However, to my surprise, the magnet slid right in!

I somehow got the magnet back out and squeezed a good amount of glue inside the hole and put the magnet back in.  Using another piece of metal on the top of the dish, I guided the magnet into the middle.

So here is the finished product!  I love it, and the magnet is so strong I don't have to worry about the needles coming off at all!

One thing I like about not having to dremel out the bottom of the dish is that I can later hang it on the wall using the two holes.


For the Home, Other

Oldie but Goldie: Boo table

When I was a freshman in college, my mom bought me a table to somehow fit into my tiny dorm room.. It was ugly and white, and my roommate and I knew we had to do something to make it fit into our room better. See, we were both artsy people so a plain white table in our colorful room would not do. My roomate brought a carpet one day and after situating the table on top of it, we knew what we had to do to the table. Here's a blurry picture of what we did:

(Thats my messy ass side of the room) We used electrical tape around the side of the table so it'd be black instead of that weird brown.. it made it look more finished.

But it doesn't end there!

I went home for the summer and the table came with me. My roommate and I decided to room together again that next year, with the addition of our next door dorm neighbor, and the apartments we chose had outdoor patios so I got super excited and decided to convert the table into a nice patio table fit for college students.

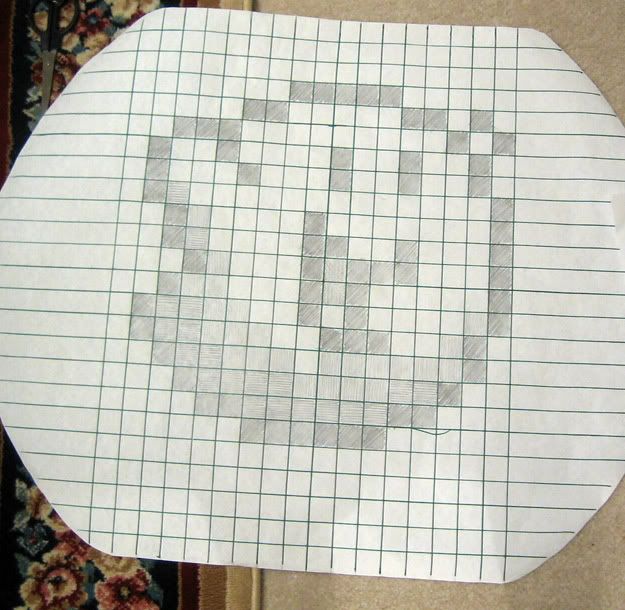
Here's my sketch:

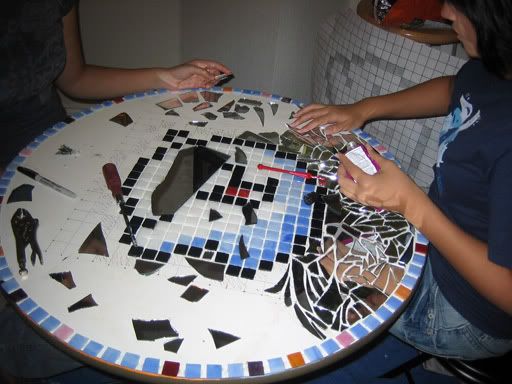
It's Boo! I used precut glass tile things from Hobby Lobby for Boo, and I used broken mirror pieces for the area around him. (They from our dorm... they weren't originally in the room, we brought these mirrors... no destruction of their property, I promise!)

Here's an in progress shot:

My older sister and I working on the table.

Before grout and inside.

After grout and outside.

So, after I made this, we went up to Austin to get our keys for the apartment and discovered that our particular apartment didn't come with a closed off patio.. we just had a kind-of-big-but-not-really area at our front door.. which I didn't feel comfortable leaving my table out at. So the tables ultimate destination that year was my sisters boyfriends apartment in his nice closed off patio. And now the table is sitting outside of my room with a nice fake glass bonsai tree sitting on top of it. I can't wait for the day that I can actually use it as an outdoor table!

For the Home, Other

ZOMBIES, WATCH OUT!

I made this for the contest over at Craftster for this month. Basically you buy anything at the dollar store, but it has to cost 10 bucks or less. There have been some amazing entries so far, so hopefully I do alright! Here's my entry:

For more pictures and a somewhat explanation/rambling, check out my post on Craftster, here. Make sure to check out the other entries as well, they're all great!