
Halloween is right around the corner, so I put together this video that has five quick and easy DIY costumes!
halloween
Paper Mache Halloween Decor Decoration
Hi, all! A few days ago I posted a tutorial on how to make Halloween decor out of paper mache, and today I'm going to show you some ways I chose to decorate said decor. Hopefully this can give you guys inspiration on your own Halloween decorating!
I hope you all enjoyed!

Paper Mache Halloween Decor
Hey guys! Today I'm going to show you how make some nice Halloween decorations with paper mache. I found some small paper mache skulls at my local craft store, and yeah, they're not too pricey, but once I saw them I knew I wanted to make some on my own. I figured I could put a bit more personality into them, and I think I succeeded. I made two types of skulls; one that's a bit cartoony looking and the other a tad more realistic. I also made a little jack-o-lantern as well. This tutorial is best viewed in video format, however I'll provide some video stills with captions after the video!
 Le supplies
 Blow up your balloons; you'll want to fill them up only halfway. For the cartoony type of skull, tape around the bottom third of the balloon. Don't worry about being precise. Once you tape it up you can squish the balloon around a bit to alter the shape of the balloon until it's just right.
 For the realistic type of skull, take some cardstock and tape it to the balloon like so. This is only going to be temporary so we can draw the face on with the correct proportions.
 Roughly sketch a skull face onto the cardstock. Carefully remove the tape and cut the shape out.
 Tape it back on. Yeah, you could probably just draw the skull face without taping it onto the balloon, but where's the fun in that? The best part is riding that fine line between almost popping the balloon and not.
 For the jack-o-lantern, wrap a balloon with three rubber bands equally spaced apart, like so.
 Draw on the face of the cartoony skull. Sure it's about to get completely covered with paper mache, but you need to sketch the whole face to see where the jawline will be. That's where we're going to stop layering on the paper mache.
 So much paper. You can use newsprint or any similarly weighted paper. I'm using brown packing paper. Tear the strips rather than cutting them, as a torn edge blends more easily.
 Glue mixture. Two parts glue, one part water.
 If so inclined, don your gloves.
 Dip a strip into the glue, wipe off the excess glue and place on balloon. Repeat x1000. But really, do about 2 or 3 layers of paper, let dry, and repeat until it feels thick enough. Mine ended up being about 7 or 8 layers I believe. Although, I wish I had done more layers on the jack-o-lantern, because, as you will soon see, after I cut the face out it wasn't very strong and it started drooping.
Anyway, once you layer enough, let it dry overnight.
 Before you pop the balloon, gently squish it down around the edge of the hardened paper shell. This should help prevent any distortions on the edge that may arise after popping the balloon.
 Snip a small hole in the balloon and let it deflate.
You re-drew the face back onto the skull right? Oh, well if not, do so now.
 Cut out the eyes, nose and mouth with the help of an xacto knife and scissors. And here he is!
 Here's a realistic-y skull. I decided to do an opened mouth one by cutting the bottom jaw and taping it on separately.
 And here's the little jack-o-lantern dude and his droopy face! When I paper mache-d him, I covered the whole thing except for about 1/8in around the knot of the balloon. That's where I popped the balloon. After I popped it, I rolled up some glue saturated paper and stuck it in the hole to create a little stem for the pumpkin. I pulled out the balloon and rubber bands after I cut the face out.

And here they are! All done!-- Well, almost anyway. I'll be posting the fully decorated pieces on Saturday the 25th, so stay tuned!
Redo Wind-up Key
Six years ago I posted a Halloween costume I made that featured a working wind up key. Four years ago I posted a tutorial on how to make said key and around Halloween it's almost always my top visited post. My husband has been wanting me to make some tutorials in video format, so I thought what better tutorial than this! So lo and behold, here's the video!
Here's a quick little photo recap of the video:
 Supplies. Not pictured are some pliers and a screwdriver that I used to take the toy apart.
 The sacrifice. Poor guy didn't see it coming.
 This toy was nice because it was held together by just two screws. After unscrewing I just pulled the mechanism out. This is all we need from him!
In the original tutorial I used pliers to break off the wind up toy grip but this time my dowel(aka the piece of bamboo I had lying around) already had a hole in it and it was the perfect size with the grip still attached, so I just kept it on.
 Mark the center point of the belt, cut a teeny tiny hole and stick the wind up mechanism through. You want to tack it down with a small dab of hot glue, taking care not to glue the moving parts.
Oh yes, the belt. That's how we will be securing the key to our bodies! I had this black elastic belt that I never wore anymore so I just used that.
 To hide the white boxy mechanism cut a piece of matching fabric (I used fleece) and attach it on the belt. You can either sew it on or hot glue it.
 Making the key pattern out of form core board. I traced a glass and then free handed the rest of it.
 So in the previous tutorial I said to use a strong glue, namely a two part epoxy, since people will be cranking that thing all night. However, I have since tested it out and using a high temperature hot glue gun works just as well. You can still use a stronger glue of course, but hot glue does work.
 For painting I did two coats of black as a base and then finished with a single coat of an antique copper.
Do not use spray paint! If you've made your key out of foam core board the chemicals in spray paint will react with the foam and eat it away. Craft paint is the way to go here.
 Almost done!
 You'll just want to put a bit of hot glue into the hole of the dowel. I had a pre-existing hole, but normally you would have had to CAREFULLY drill a small hole on the end of the key.
 And here it is on the back of my costume!
 And in motion!
So I hope you guys enjoyed the video. Is that something I should do more often? Let me know! It's pretty weird to sit there and talk to the camera, but it turned out alright I think.
Halloween Costumes

So Thanksgiving is a few days away, so what am I posting? My finished Halloween costumes of course! Sorry it took forever to get these photos, my sister took them and she has been quite busy with school so it took her a while to send them my way. Well, better late then never!
So as most of you know, I decided on Poison Ivy this year. I dyed my stockings, I made my gloves, I made my boots, I made the leafy eyebrow pieces and I made some fake lashes to top it off (which I did wear for the party I went to, but I forgot to bring them to take pictures of the costume a few days later unfortunately). 
Full body shot
 Close up of my face.
I ended up being invited to another Halloween party last minute, but I didn't want to reuse the same costume (mostly for comfort reasons - those boots killed my feet) so I pulled out my old wind up key that I made for Halloween a few years ago and two petticoats I made - one for Halloween and one for a friends bachelorette party and a little flower ring I made - and threw a costume together.  I made the black circle skirt on a whim a few days before I was invited to the party and thought it would fit the costume perfectly. I decided the color scheme would be black and pink because the belt, one of the petticoats and the ring were hot pink (my friend had a Barbie bachelorette party). I poked a hole through the back of the belt and stuck the wind up key through it. They day of I actually curled my hair and my sister loaned me a pair of pink and white socks. I also had a different pair of black flats. I went with contacts as well because the fake eyelashes were too big to be contained by glasses.
 Here is a kind of crummy picture of the costume the day of the party so you can see my hair (kind of), the socks and the wind up key.
My sister needed a costume to wear at her extra curricular activities and whatnot and after finding some awesome fabric at the store she decided she wanted me to make her a simple cloak so she could be a wizard. I also ended up making her a want too as seen in this post.
 Here is what the fabric looks like with the wand.
I found a lot of patterns for "circle skirt" type cloaks but I wanted to do something fairly simple because I didn't have that much time and I only had two yards of fabric. I ended up finding this website that explained how to make a cloak very simply and with a maximum of 2 yards of fabric, yay!
And action shots:
 I made the hood come to a point.
 The fabric flowed nicely and looked awesome when she walked around.
 She just wore her street clothes underneath.
I actually really loved how the cloak turned out. I'm half considering being something next Halloween that involves a cloak of some kind so I can make myself one!
Freaky Friday!
So I've been pretty busy with crafting especially with Halloween right around the corner, and thankfully I've actually managed to take some pictures for you guys to see! I was meaning to make this post earlier but time caught up with me so here we are. Sorry about that! To make up for that, this is pretty much going to be three posts in one! I have two parts of my costume I need to show off as well as a semi tutorial on how to make a wand for my sister's costume. So here we go!
I'm going to be Poison Ivy from Batman this year. So first things first, for my costume I decided I wanted to wear some sort of heel. I wanted to see if I could score some green pumps from Goodwill, but I ended up going home with these:
 I decided I could just cover them with some leaves and be done with it, so I ended up with these:
 Which look... okay. I tried them on with my dyed tights, but I didn't really like how they looked with everything. I was just going to suck it up and deal with it, until one day I decided that I NEEDED some knee high super villain looking boots. I looked up some tutorials for converting high heels into boots, and found a simple boot cover tutorial by Sarcasm-hime. Easy enough! I got green vinyl from the fabric store (it was half off! Score!) and got to boot-coverin'. I've seen where people just sew the bottom up and leave a hole for the heel, so you can just slip the cover off and on, but I opted for a more permanent solution. I used hot glue to secure that sucker down. Here they are:

They ended up kind of wrinkly since the vinyl fabric wasn't cooperating very well, but I think they'll work out just fine for my costume. This actually worked out a lot better than I thought it would, and I'm probably going to attempt to make more boots sometime.
So next! I wanted some long gloves to make this costume complete. I had no idea on how to make gloves, so I started trying to search for some patterns online. I found some really complicated ones, and I even found how to draft a custom glove pattern that I tried out (with muslin!) but I got some of the measurements wrong and I decided that those types of gloves would be too much work for a little Halloween costume that I'd wear once or twice. I didn't want to make gloves that were as easy as just tracing around your hand and sewing along that line, but I didn't want to waste time doing the super complicated gloves, so lucky for me I found something that was in between those two. I ended up finding a video that taught you how to draft a pretty easy pattern for gloves. Click here to see!
 So here's my drafted pattern. I messed up on marking the thumb. The bigger curve is the correct one. If you want to know how to do this, please watch the video I linked to above. He's much better at explaining it than I would be!
 My master patterns!
 He recommends using tissue paper to draw your pattern on, so I grabbed the closest tissue paper I had around me. Primary color polka-dotted tissue paper, ftw!
  I pinned the tissue paper onto my stretchy knit fabric and started sewing.
 When done sewing, you cut out the thumb hole and then just rip the tissue paper right off!
  One finished glove!

 And here's what it looks like on. Pretty wrinkly, but it will serve its purpose.
I actually liked making the more complicated gloves, but I'll probably try those out again with better fabric and more time.
So on to the last part. My sister wanted to be a wizard, so I ended up making her a long hooded cape and a wand. I don't have any great photos of the cape yet, but she will send me some soon. I did, however, take photos of the wand. So many, in fact, that it serves as a sort of tutorial! So here we go:
 It started with a stuffing stick. I got it in a bag of poly-fil. You could just use a dowel or a disposable chopstick or something. If you use a dowel you'll have to sand down one end to make it tapered.
 I wanted to add decorative elements, so I whipped out my trusty hot glue gun! You can do whatever you'd like. The stick is pretty skinny, so I was limited, but I just added some bands and dots and stuff.
 Here's some of the decorations. Don't worry, it'll look better I promise.
 I wanted to make a sort of handle and I had left over leather strips from my purse, so I ended up hot gluing it to the base of the wand. Lookin' pretty snazzy! Now pull out your paints! (You should probably wait until after painting to do this step, but I wasn't thinking.)
 I just used some acrylic paints I had laying around. I didn't have brown, so I mixed the primary colors together-red, blue and yellow, and it made a nice brown color for me. Slap that paint on there! I showed my sister the wand at this point and she thought I had carved the decorations out. That means it's coming along!
 To make the decorations pop, I painted them with some gold acrylic paint. I actually wanted to add some gems or something like that on the middle decorated part, but I had none so I just stopped there. I was pretty pleased with how it came out!
Here's the (folded) cape and wand together! When she gets those pictures to me, I shall post a better picture of the cape.
Phew! That was a doozy of a post! Sometime next week I'll post photos of my completed costume as well as my sister's. I hope this post was helpful to you guys! If you have any questions just leave me a comment and I'll answer it to the best of my ability! :)
Horny Hair Clips
I'm planning on participating in a Warrior Dash next year, but I need to train so I'll be able to run and do the obstacles in a decent time. A lot of people dress up as viking warriors for the race, and I thought it would be cute to just have horns, since there's no way I would be wearing a costume or a viking helmet while running. I'd die. I didn't want to make a headband with horns on it because I was worried it would just fly off during the race; headbands always fall off of my weirdly shaped head, so I decided some hair clips could possibly work! I decided to make them now because firstly, they would make for a good addition to a costume that involved horns of some kind, and secondly, if I see them every day on my desk it will remind me to keep up with my training.

Here are the materials:
- Felt
- Hair clips
- Needle & thread
- Stuffing
 I cut out four horn shapes from the felt. Not pictured, I also cut out four triangular shapes- two to help shape the horn better and two for the bottom of the horn.
Here I am sewing up a horn. I sewed up the sides and two edges of the bottom and then flipped right side out, stuffed it and sewed closed.


And ta da! Clip in your hair!
 And there you go! They stay in very well, I shook my head and ran around trying to gauge how well it would stay and it didn't budge at all. We'll see how well it stays in the race though...
You could definitely make different kinds of horns or animal ears or anything like that with hair clips, they're super cute!
DIY Fake Lashes
Need some gigantic eyelashes sometime soon, say, for Halloween, and don't want to pay almost $10 for them? Well I got the tutorial for you! I found a tutorial on youtube on how to make your own false lashes with just a few materials that most people have around and got to makin'.
 Materials:
- Another fake eyelash (this is just to give you a guide at how long you need to make the lash. You could also just take a small piece of paper and measure your eye that way)
- Eyelash glue (Not everyone will have this item; I didn't, but it's fairly inexpensive for a bottle of some, especially considering just how many eyelashes you can make with one tube)
- An old makeup brush (Mine had really stiff bristles so I would never use it because it poked my face all the time. Be sure to wash it before using it!(Thanks MissVass on reddit. I assumed this would be common knowledge but better to be safe than sorry!))
- a plastic work surface (I used a tupperware lid)
- Something to help you manage the bristles when you inevitably get glue on your fingers (I used a disposable eyeshadow swab thing. In the video she uses a spatula.)
- Black eyeshadow(not pictured)
- Hair spray(not pictured)
- A curling iron
- Scissors
- Any little things you want to add to it for decoration (feathers, glitter, sequins, etc.)

Using the other eyelash as a guide, draw a line of eyelash glue.

Take a little bit of the makeup brush and snip it off at the base.

Spread it out carefully with your fingers and place the cut edge into the glue. Use your "bristle managing" tool (in my case the eyeshadow swab thingie) to hold the bristles down so you can let go of them without taking too many back out. I found that the bristles kept sticking to my fingers, so that tool was very important. Repeat this a few times until you made them as thick as you want.

Use your tool to really press the bristles into the glue. You'll want to wipe down the tool every once in a while because as it gets more glue stuck to it, the bristles may want to follow it.

Once it's dried for a few minutes, put a dab of glue on the end of your tool and carefully coat the top of the edge of glue. Let dry.

Once dried, CAREFULLY lift the eyelash up, holding on to the edge of the glue strip.

Powder the front and back of the strip of glue with black eyeshadow.

Cut off excess glue strip. Be careful not to cut of too much, you'll lose too many bristles!

Trim the lashes into the shape you want. In my case it's shorter towards the inside of my eye, and thicker towards the outside.

Use a hot curling iron to shape the lashes. BE CAREFUL! I was using tweezers to do this at first to keep my fingers safely out of the heat, but I misplaced them as I was taking these pictures, so I'm using my fingers to show what to do. Luckily my fingernails are long enough. After they're curled as much as you want them, generously spray some hairspray all over them. Of course by the time I was taking pictures I had run out of hairspray, so I have no pictures of this process, sorry.

And here are your lashes! In this picture you can see the difference between the hairsprayed lash(left) and the un-hairsprayed lash(right). They keep their shape much better when they have a good coat of hairspray on them.
This is also the point where you would add decorative features if you want. Maybe some glitter along the glue line, feathers glued onto the bristles, the possibilities are endless!
Here are some action shots:


All in all, I really liked making these, and I plan on experimenting with more materials. Definitely going to make some that fit the theme of my Poison Ivy Halloween costume! The best thing is that you can trim them down a lot to make false eyelashes that you could potentially wear on less costumey occasions.
If any of you guys decide on trying these out, I'd love to see!
xoxo-chez
Dyed Tights with Food Coloring
For Halloween I decided I was going to be Poison Ivy from Batman. I needed green tights, and of course the one time I need them, there aren't any green tights at all. Frustrated, I bought a pair of opaque white tights with the intention of dyeing them with food coloring. I had seen people dye yarn this way, what would be the difference?

Here are my materials: white tights, food coloring (I used green and yellow), vinegar, a stainless steel pot and a measuring cup.

Pour water in the pot. It varies for how much you're dyeing. I used about 4 cups.

From what I read about yarn dyeing, people added about one tablespoon of vinegar to each cup of water. So I used 4 tablespoons. The vinegar makes the color really stay in the fabric.

I put the tights in some water to soak for a bit while I mixed and heated the dye bath.

Add your food coloring to the water/vinegar mixture! I wanted it to be a very greenish yellowish and I was worried the tights wouldn't take the color so well because of the material it was made of, so I used a lot of food coloring.

That looks about right. Now heat it on medium heat until it simmers

Squeeze the water out of the tights and throw them in the simmering dye bath.

Make sure to get all of the material submerged. This was kind of hard for me because the fabric kept floating up to the top. You're supposed to stir it every once in a while as it dyes, but I overestimated just how long it would take to take the color, so I didn't get to stir it at all, which caused an uneven color. Fortunately that's not a big deal for my costume, but if you want an even color, make sure to stir it every few minutes. I'm pretty sure I could go back later and re-dye it later anyway.

You know when it's done dyeing when the water is pretty much clear. You can kind of see in this picture, the water is significantly clearer than before I added the tights. It's a pretty bluish green color. I probably could have left it in longer to get more color but I was satisfied with what shade it was so I turned off the heat and let it cool.

Once cooled enough for you to touch, rinse it with water and a tiny bit of dish soap until the water runs clear.

Rinsing!

And here they are! You can really see how uneven the dye job was in this picture. Overall I'm super happy with the results, and I'm planning on dyeing more and more tights and things. Hopefully with time I'll get better at achieving an even color. Maybe I'll even be brave and attempt an ombre sometime!
I will eventually get an action shot of these tights, but it will probably come after I get the whole costume done.
xoxo-chez
How to Wind-up Key
UPDATE: I made an updated video version of this tutorial! Check it out! Hope this is helpful!
------------
So, it's been a while... stress filled senior year of college. Anyway, I've received a lot of comments asking for a tutorial on how to make this key for a Halloween costume I had made a while ago. I had started to create a tutorial for this but I ended up moving and all that stuff got packed away, but I just so happened to find all my stuff the other day, so I figured I'd throw this post up before Halloween so hopefully you guys can make yours in time. :)
The parts:

Here are the parts for the wind up key.
A few inches of dowel (really the length and size of the dowel are up to you. I used what I had, which is a 1/4" dowel which I cut to be 2 1/2" long. You'll need to drill a small hole into one side of the dowel in order to fit the metal rod of the wind up mechanism. I used a small drill kit that I bought from the local hardware store that looked like a screwdriver but with interchangeable drill-bit head things. Be slow with this part, or you may split the wood like I did. Don't panic if you do though, it should be okay once we glue it all up.
The next thing you'll need is a piece of foam core board cut to resemble a wind up key. Cut the little notch at the bottom to be the same width as your dowel. In my case it's 1/4". I imagine you can use something other than foam core board, but you just need to make sure it's lightweight, or else it will bog down the tiny wind up mechanism we're using.
Speaking of, the third thing you'll need is the wind up mechanism. To get it, I took apart a dollar store wind up toy. Usually there's a little piece of plastic at the end of the metal rod that makes it easier to turn with your fingers that you need to remove so you can stick it in the dowel. I just used some pliers and squeezed it a bunch until it broke off.

I used some quick drying epoxy to glue everything together. You need to make sure to use some heavy duty stuff because people will be cranking that thing all night and you don't want it to start falling apart on you. If you choose to use epoxy, be sure to do so in a well ventilated area because this stuff reeks!

Epoxying in progress.

Here it is, now attached to the mechanism. Be careful not to drop epoxy or glue down into the mechanism or else it may screw up the gears and whatnot inside and it won't work anymore. As mentioned before, I had split the wood somewhat during the drilling progress, so here I also squished some epoxy down into the crack to make it stronger.

And here it is painted. I just used some craft paints on this one. The very first one I did was spray painted, so really it's up to you on how you want to do it. If you spray paint it though, be sure to tape up the mechanism really well beforehand. Or you could just paint it before you attach the mechanism.
Now, when I used this in a costume I ended up carefully duct taping the mechanism onto a piece of cardboard(to help stabilize it) that was a little smaller than the width of my back and a few inches high, then I proceeded to duct tape the cardboard onto the tank top I was wearing. I literally duct taped this thing onto me for the whole night(it was hidden under my corset thing), but that was the best I could come up with at the time. If anyone else has any better ideas on how to wear this thing please let me know, it would be much appreciated! Thanks :)
Hope this helps you guys out!
Wind me up!
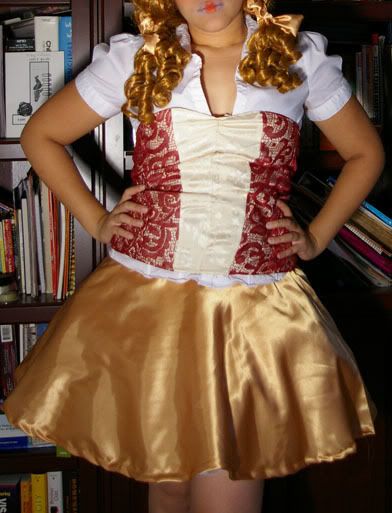
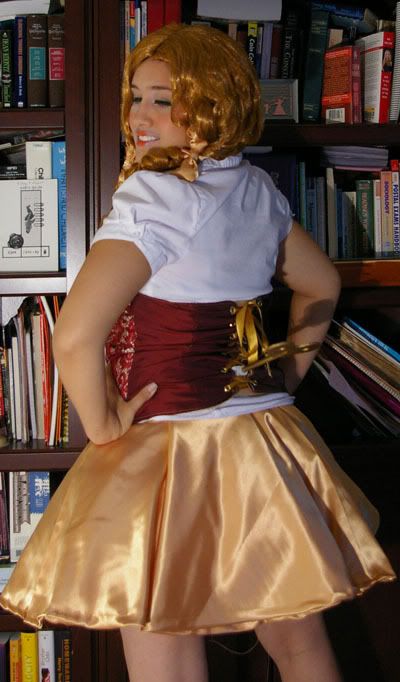
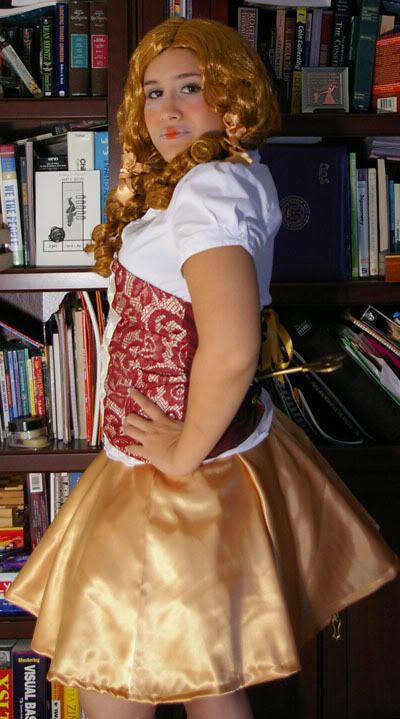
Phew, it's been a while! If you guys hadn't noticed, this blogging thing is pretty difficult for me to stay on top of. Hopefully soon I'll be able to post somewhat regularly, haha. :) I've done a few things between now and my last post.. one of the biggest things being attending the Austin Maker Faire.. and I know I'm going to be a few weeks late, but I'll eventually post a few of my pictures from there. I also made a duct tape dressform for my little sister and I've started a jacket.. which has been sitting in my room half finished for about a week. Oh yeah, I just made these awesome earrings, but you'll just have to wait for those pictures because this post is really for my... halloween costume!
I decided to be a wind up doll and I really wanted to put moving parts on it.. of course that would be the little key part on the back. All in all, I made a corset-ish type top, a simple circle skirt and an awesome petticoat that I love.. and will definately use again.. but I don't have any pictures of it because it's pretty see through. Last year I made a last minute petticoat with tulle and I just took a piece and gathered it so it was kind of like a tutu, but I really hated it.. it was uncomfortable and I didn't like the way it looked, so this year I decided to put more time and money into one so hopefully I could reuse it time and time again. I used this tutorial by sugardale but I shortened the length to fit the skirt. It was somewhat time consuming, took up a lot of thread, but overall I'm super happy with the result and I know I'll be saving it to use again and again!
For the skirt I also used a tutorial, but I cannot find the exact one I used right now, but there are pages and pages of circle skirt patterns when I searched google, so if you need one that's a good resource.
I'm not too happy with how the top came out.. I really wanted it to be a corset, but I just wasn't confident enough with myself and I just ended up sewing panels together and lacing up the back.. so it was somewhat like a corset. I refused to buy a pattern and tried to make one myself, which I regret doing, but it was too late to go out and buy one by the time I was making the top, so I guess I just lived and learned :)
So, I've been building up the anticipation to see this costume I've been rambling on about, so I present now, the pictures!
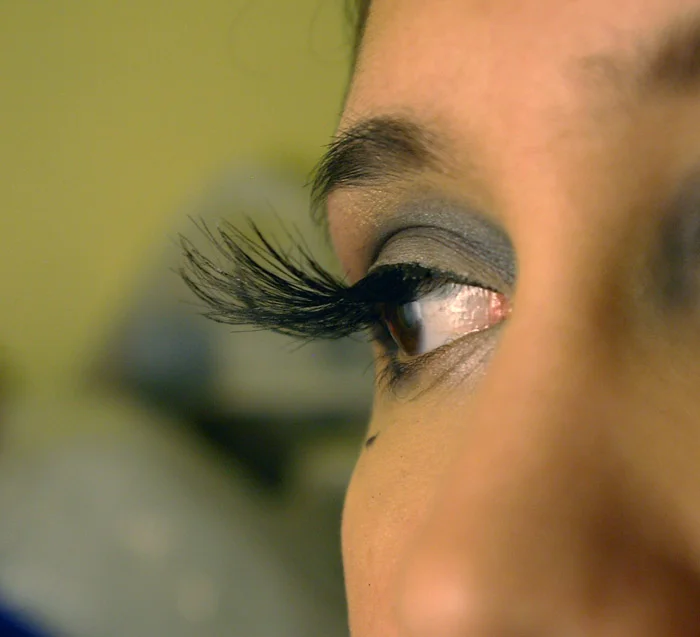
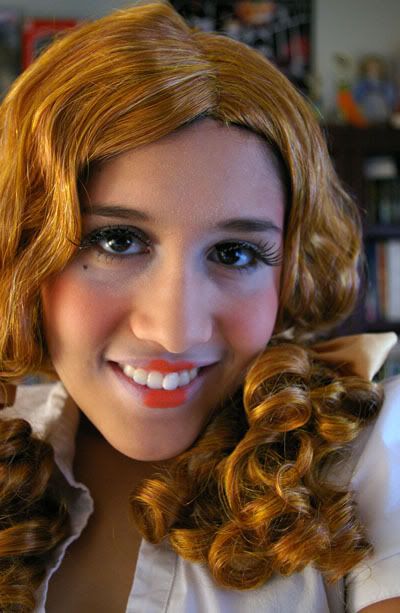
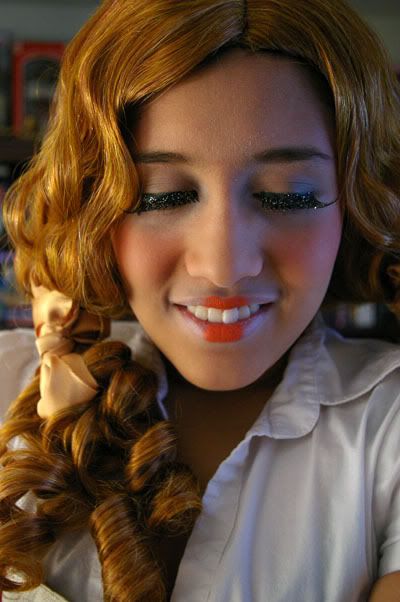
The makeup:
And finally, the part I'm most proud of with this costume... the wind-able key! httpv://www.youtube.com/watch?v=7alUNLzpOyo Testing it out.
httpv://www.youtube.com/watch?v=DdozzPiu9iU Actually on the costume.
So there's that. I hope you guys enjoyed it, unfortunately I'm the only one who enjoyed this costume haha, for the party I was going to attend didn't happen, so I spent all night on Halloween playing Little Big Planet. :)